MikroTik Device-Mode: Security and Ops Guide
Summary
Device-mode is RouterOS’ “feature gate” for risky subsystems. This guide explains how it works, why it exists, what changes across versions, and how to keep automation and MKController adoption smooth.
MikroTik Device-Mode: Security and Ops Guide
What device-mode is (and what it is not)
MikroTik RouterOS historically assumed that if you authenticated, you were trusted. That mindset stopped aging well.
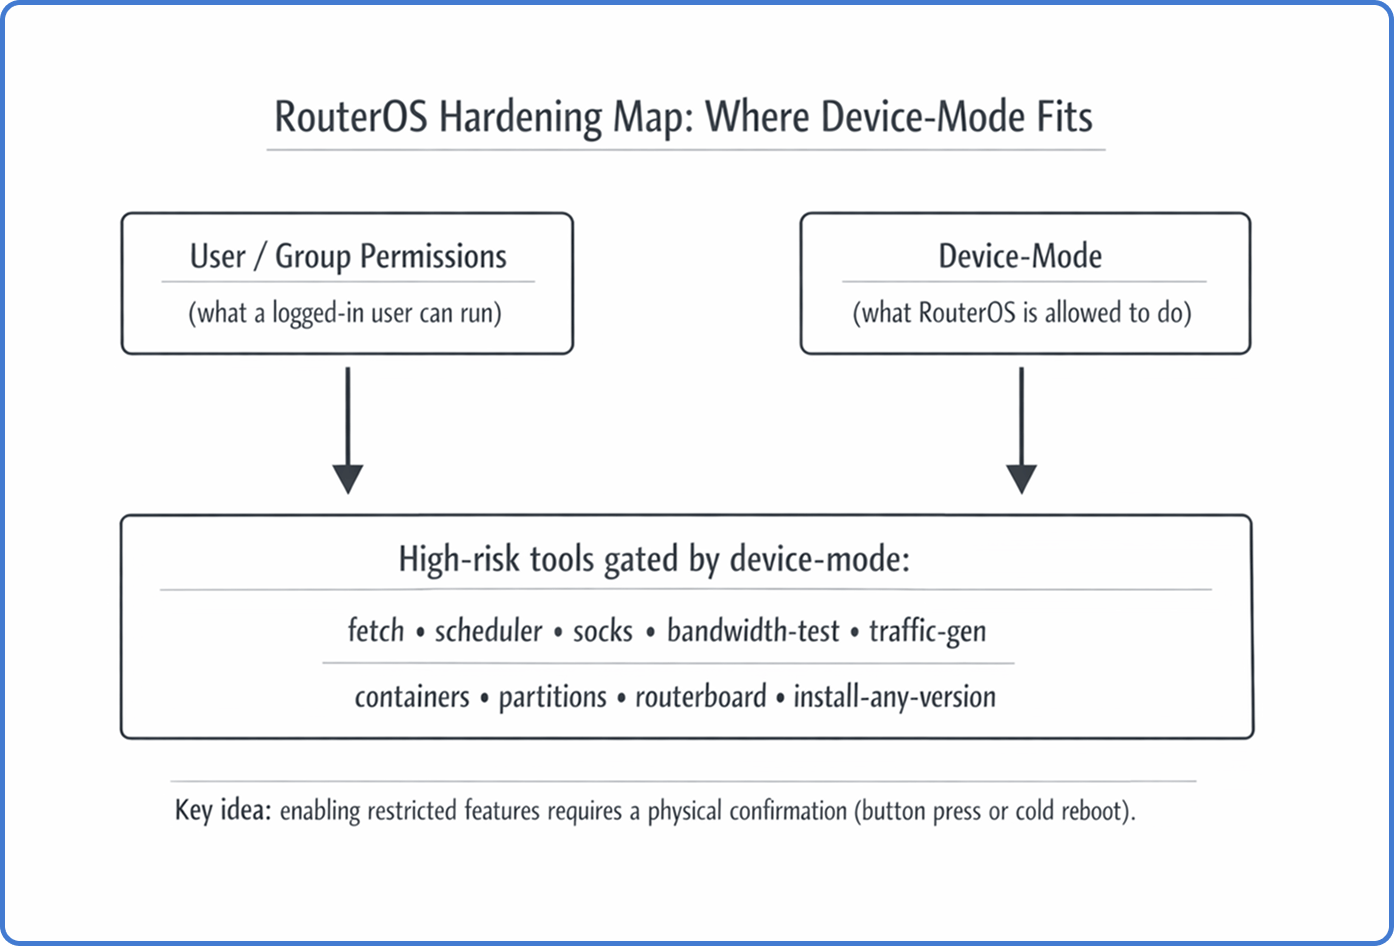
Device-mode is a persistent security state that decides what the operating system itself can do, regardless of who logs in. It lives “below” user permissions. So, even a full admin session cannot enable certain high-risk tools unless the device-mode policy allows it.
Device-mode is also different from Safe Mode. Safe Mode helps you avoid lockouts while making changes. Device-mode is a long-lived capability policy that survives reboots and upgrades.
Why MikroTik introduced device-mode
The short version: attackers learned how to turn edge routers into internet-scale weapons.
A major driver was the Mēris botnet era. Compromised routers were used as relays and traffic generators by abusing features that are legitimate for network engineers, but devastating at scale when hijacked.
Commonly abused items included:
- SOCKS proxy, used to tunnel attack traffic.
- Bandwidth-test, abused for traffic amplification.
- Scheduler + fetch, used for persistence and payload delivery.
Device-mode aims to enforce the principle of least privilege at the platform level. It makes “remote takeover” less profitable. An attacker might steal credentials, but they still cannot flip the riskiest switches without a physical step.
The physical confirmation handshake
A defining rule is physical access verification.
If you try to transition a restricted feature from no to yes, RouterOS can accept the request but keeps it in a pending state. You must confirm locally, usually with a button press or a cold reboot (power cycle) within the configured timeout.
That means the security boundary is not your password alone. It is your password plus proof that someone can touch the box.
Tip: Treat device-mode changes like “change control.” If the device is at a remote site, plan how you will do the required power cycle (smart PDU, managed PoE, onsite hands).
Where device-mode sits in the security stack
Here’s a practical mental model:
- User groups: “What this user can click or type.”
- Firewall: “What traffic can reach services.”
- Device-mode: “What the OS is allowed to run at all.”
So no, device-mode does not replace the firewall. It is a last line of defense when something else goes wrong.
Modes, flags, and what gets blocked in real life
Device-mode is configured under /system/device-mode. Internally, it is a set of boolean flags that gate subsystems.
Examples of flags that frequently hit real operations:
fetch: blocks/tool/fetchand any automation that depends on it.scheduler: blocks/system/schedulerand scheduled scripts.socks: blocks enabling SOCKS proxy.bandwidth-testandtraffic-gen: block BTest and traffic generation tools.container: blocks RouterOS containers unless explicitly enabled.partitionsandrouterboard: block low-level storage and boot settings changes.install-any-version/allowed-versions: reduces downgrade paths that reintroduce old vulnerabilities.
Depending on RouterOS version, MikroTik also introduced predefined modes (for example: home, basic, advanced, and rose for specific hardware classes). The names matter less than the outcome. A new device can arrive with a restrictive posture that breaks your defaults until you plan for it.
Versioned Technical Evolution and Changelog Analysis
The implementation of device-mode has followed a non-linear path, expanding from a specialized control for containers to a comprehensive system-wide enforcement framework.
Phase 1: Container Security (RouterOS v7.4beta - v7.12)
The initial appearance of device-mode was tied to the introduction of container support (Docker-compatible environments) in RouterOS v7.4beta.9 MikroTik recognized that allowing third-party binary execution was an unprecedented risk for RouterOS. Consequently, the container package was the first feature to require activation via /system/device-mode/update container=yes followed by a button press.9 During this period, device-mode was largely seen as a “container safety switch” rather than a broader governance framework.
Phase 2: The Security Baseline (v7.13 and v6.49.8)
In a critical move for long-term support, MikroTik backported elements of device-mode to the v6 branch in version 6.49.8 and introduced the allowed-versions property in version 7.13.1 The allowed-versions field (e.g., 7.13+, 6.49.8+) restricts the ability to downgrade a device to firmware versions released before major security patches were implemented.1 This effectively blocks “rollback attacks” where an attacker attempts to downgrade a router to an older version susceptible to exploits like Chimay-Red (CVE-2017-20149).8
Phase 3: The Version 7.17 Overhaul
Version 7.17, released in early 2025, represented the most significant expansion of the framework. It introduced the concept of predefined “modes” that categorize devices based on their hardware tier and expected environment.1
| Mode Name | Hardware Tier | Security Posture | Key Restrictions (Default) |
|---|---|---|---|
| Advanced | CCR, 1100, High-end | Permissive | container, traffic-gen, install-any-version |
| Home | hAP, cAP, SOHO | Strict | scheduler, fetch, socks, bandwidth-test, sniffer |
| Basic | Standard RB, Switches | Balanced | socks, bandwidth-test, proxy, zerotier |
| Rose | RDS, Outdoor Wireless | Special Use | Same as Advanced but with container=yes¹ |
¹ During the upgrade to v7.17, the system automatically renamed the legacy “enterprise” mode to “advanced”.1 For existing deployments, MikroTik attempted to preserve functionality by defaulting upgraded devices to the mode that most closely matched their hardware profile.1 However, this led to immediate operational friction, as features like traffic-gen (essential for /tool flood-ping) and repartition became disabled even in “advanced” mode.10
Phase 4: Automation and Refinement (v7.19 - v7.22)
The most recent branch of RouterOS has focused on resolving the “automation deadlock” caused by the physical access requirement. Version 7.19.4 introduced the rose mode, specifically for RDS devices to support factory container installations.1
The 7.22rc3 release (February 2026) introduced a breakthrough for large-scale provisioning. It added the ability to configure device-mode via Netinstall and FlashFig using a “mode script”.16 This allows ISPs to define the security state during the initial image flash, bypassing the need for physical button presses on thousands of units.17 Notably, version 7.22rc3 also removed the authorized-public-key-hash property, which had been a source of community speculation regarding remote mode changes via SSH keys.16
“Flagged” state and the attempt counter
Device-mode is not only static flags.
RouterOS can mark a device as flagged when it detects suspicious patterns, such as system file tampering or script behavior that looks like persistence. When flagged, RouterOS may enforce an even stricter safe state by disabling restricted tools.
There is also an attempt counter for failed device-mode changes. If something (legitimate script or malware) keeps trying to change device-mode without physical confirmation, the counter can lock further updates until a physical reboot.
Operational meaning: when you see unexpected attempt counts, investigate first. Don’t just enable more features to “make it work.”
Provisioning pain: the automation deadlock
ISPs and large fleets love zero-touch provisioning. Device-mode can make that harder.
A classic deadlock looks like this:
- The router boots in a restrictive mode.
- Your first-boot script needs
/tool/fetchto download a config or certificates. fetchis blocked by device-mode.- The bootstrap fails, and the device never reaches the state where you can remotely fix it.
Some teams end up unboxing every unit, enabling features manually, and reboxing. That is not a scalable hobby.
Newer provisioning workflows started to improve by allowing device-mode to be set during imaging (for example, via Netinstall/FlashFig “mode scripts” in newer RouterOS branches). If you manage volume, plan your golden image process accordingly.
Warning: A standard
/system/reset-configurationmay not reset device-mode on many models. If your process assumes “reset equals factory,” you can get unpleasant surprises.
How to safely enable a needed feature (CLI example)
When you truly need a gated feature, do it with a predictable procedure.
- Check current state
/system/device-mode/print- Request the change with a timeout
/system/device-mode/update fetch=yes activation-timeout=10m- Perform the physical confirmation
- Press the Mode/Reset button once (model-dependent), or
- Power-cycle the device (cold reboot).
- Verify
/system/device-mode/printIf you miss the timeout, RouterOS discards the pending change and keeps the old policy.
Risk-based enabling: quick decision matrix
| Capability | Typical legit need | Main risk | Safer approach |
|---|---|---|---|
fetch | pull configs, renew certs | remote payload delivery | allow only to known HTTPS endpoints; restrict egress |
scheduler | backups, maintenance jobs | persistence | keep scripts minimal; monitor for unexpected jobs |
socks | internal tunneling | botnet relay | bind to mgmt VLAN only; restrict by firewall |
traffic-gen / bandwidth-test | link tests | DoS/amplification | enable only during maintenance windows |
container | run services on the router | long-lived persistence | prefer dedicated servers; harden storage and firewall |
How this impacts MKController adoption (Device-Mode disabled)
MKController depends on predictable management access. Device-mode can be the “invisible handbrake” during onboarding.
If device-mode blocks a required action (for example, enabling a needed service, running a script, or allowing a tool used during setup), your adoption flow can stall. The symptom often looks like “the device is reachable, but tasks fail.”
This is why the troubleshooting guide highlights Device-Mode disabled as a specific item to check: if device-mode is preventing required capabilities, you may need a planned physical confirmation step before the device can be fully adopted and managed in MKController. See item 4 here: https://mkcontroller.com/docs/management/troubleshooting/troubleshooting/#4-device-mode-disabled
Practical takeaway: when deploying at scale, include a device-mode policy in your staging checklist. Decide which flags you will allow before shipping. Document how physical confirmation will happen. It saves support cycles later.
Where MKController helps: Once the device is adopted, MKController reduces repeated logins and manual checks by centralizing inventory, access governance, and operational visibility. That way, you only touch device-mode when there is a real, justified need.
Post-upgrade checklist you can standardize
Use this after RouterOS upgrades or when receiving new hardware:
- Confirm the current mode and whether it matches your policy.
- Validate tooling you depend on (for example, whether
fetchandschedulerare usable). - Check allowed versions policy if you operate regulated environments.
- Inspect attempt-count and
flaggedstate for anomalies. - Document which sites require physical confirmation and how you will do it.
For official baseline docs on device-mode, MikroTik’s documentation is a good starting point: https://help.mikrotik.com/docs/spaces/ROS/pages/93749258/Device-mode
About MKController
Hope the insights above helped you navigate your MikroTik and Internet universe a little better! 🚀
Whether you’re fine-tuning configs or just trying to bring some order to the network madness, MKController is here to make your life simpler.
With centralized cloud management, automated security updates, and a dashboard that anyone can master, we’ve got what it takes to upgrade your operation.
👉 Start your free 3-day trial now at mkcontroller.com — and see what effortless network control really looks like.