News
MikroTik Device-Mode Security Guide
Learn how RouterOS device-mode restricts risky tools, why it exists, and how to plan provisioning and MKController adoption without surprises.
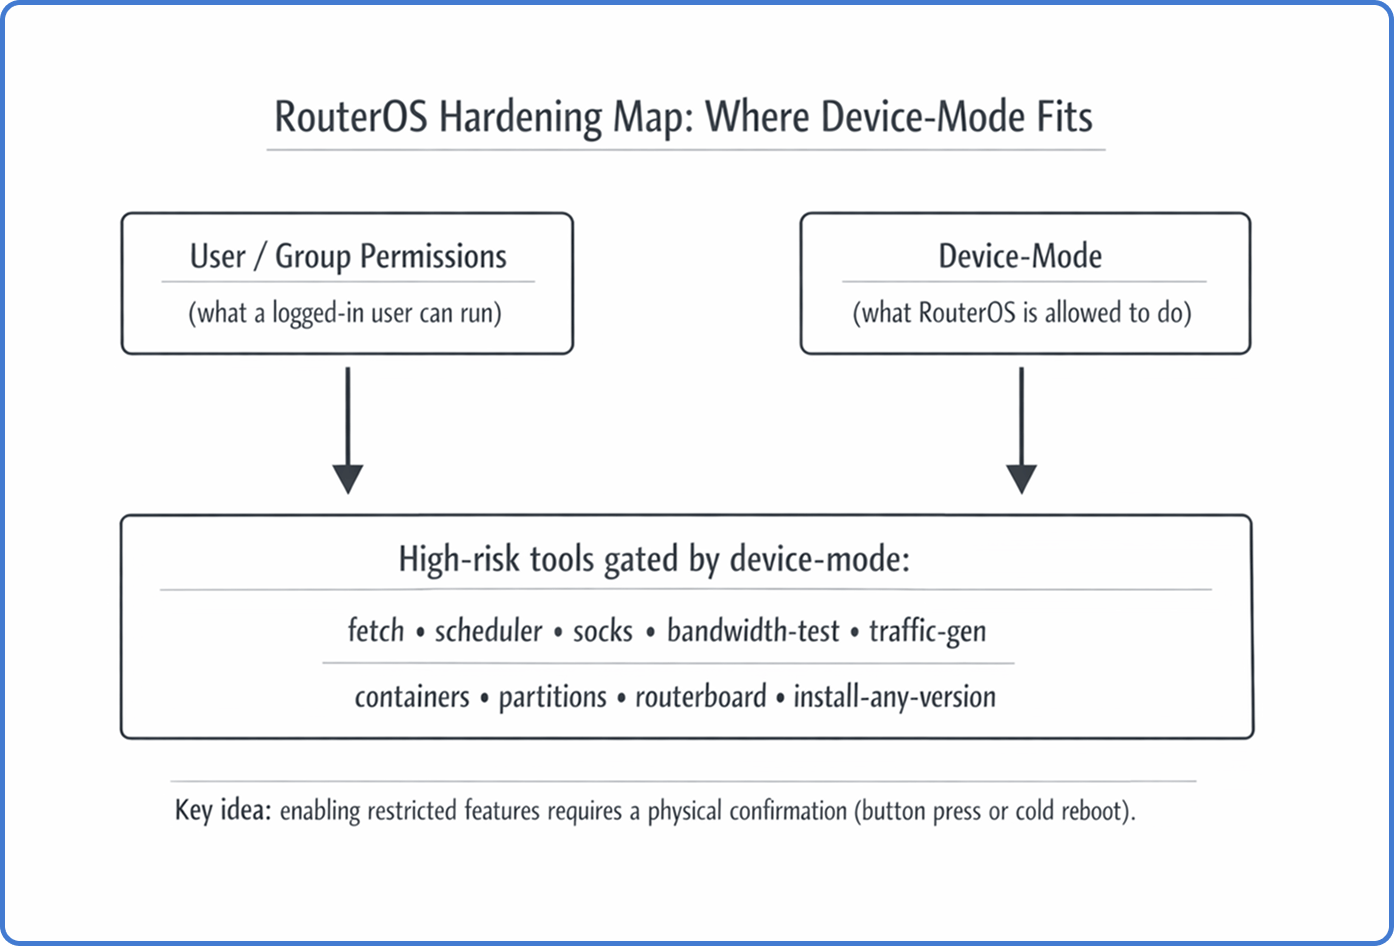
Summary Device-mode is RouterOS’s persistent capability gate for high-risk subsystems — fetch, scheduler, SOCKS proxy, bandwidth-test, containers, and more. It lives below user permissions, so even a full admin can’t enable certain tools without a physical button-press or power-cycle confirmation. This guide explains how it works, why MikroTik introduced it after the Mēris botnet era, how it has evolved through RouterOS v7.4 to v7.22, and how to plan provisioning so MKController adoption stays smooth.
What is RouterOS device-mode?
Device-mode is a persistent RouterOS security state that decides what the OS itself can do, regardless of which user is logged in. It lives below user permissions: even a full admin session cannot enable certain high-risk tools unless the device-mode policy allows it, and the security boundary becomes “your password plus physical proof that someone can touch the box.”
Device-mode is different from Safe Mode. Safe Mode protects you from configuration lockouts during interactive changes (it rolls back if the session disconnects). Device-mode is a long-lived capability policy that survives reboots and upgrades — once a feature is gated, every reboot keeps it gated until an explicit physical confirmation reverses the decision.
Why MikroTik introduced device-mode
Attackers learned how to turn edge routers into internet-scale weapons. The Mēris botnet was the inflection point — compromised MikroTik devices were used as relays and traffic generators by abusing features that are legitimate for network engineers but devastating when hijacked: SOCKS proxy for tunneling attack traffic, bandwidth-test for amplification, scheduler + fetch for persistence and payload delivery.
Device-mode enforces least privilege at the platform level so a stolen credential alone can’t flip the riskiest switches. The security boundary becomes “your password plus physical proof that someone can touch the box.”
The physical confirmation handshake
If you try to transition a restricted feature from no to yes, RouterOS accepts the request but keeps it pending. You must confirm locally with a button press or a cold reboot within the configured timeout, or RouterOS discards the change. For remote sites, plan how the required power cycle will happen — smart PDU, managed PoE injector, or onsite hands. Device-mode does not replace the firewall or user permissions — it sits below them as the last line of defense.
Modes, flags, and what gets blocked
Device-mode is configured under /system/device-mode. Internally it is a set of boolean flags that gate specific subsystems. The flags that show up in real operations:
fetch— blocks/tool/fetchand any automation depending on it.scheduler— blocks/system/schedulerand scheduled scripts.socks— blocks enabling SOCKS proxy.bandwidth-testandtraffic-gen— block BTest and traffic generation.container— blocks RouterOS containers unless explicitly enabled.partitionsandrouterboard— block low-level storage and boot setting changes.install-any-version/allowed-versions— restrict downgrade paths that reintroduce old vulnerabilities.
Newer RouterOS versions introduced predefined modes that group flags by hardware tier:
| Mode | Hardware tier | Posture | Key default restrictions |
|---|---|---|---|
| advanced | CCR, 1100, high-end | Permissive | container, traffic-gen, install-any-version |
| home | hAP, cAP, SOHO | Strict | scheduler, fetch, socks, bandwidth-test, sniffer |
| basic | Standard RB, switches | Balanced | socks, bandwidth-test, proxy, zerotier |
| rose | RDS, outdoor wireless | Special use | Same as advanced but with container=yes |
A new device can arrive with a restrictive posture that breaks your standard automation until you plan for it.
Version evolution
Device-mode has expanded from a specialized container control into a comprehensive framework. It first appeared in v7.4beta tied to container support — the first feature requiring /system/device-mode/update container=yes and a button press. v7.13 (and v6.49.8 backport) introduced allowed-versions to block rollback attacks against older CVEs. v7.17 (early 2025) brought predefined modes by hardware tier with automatic mode assignment during upgrade. v7.19–v7.22 addressed the “automation deadlock” — v7.22rc3 (February 2026) added the ability to configure device-mode via Netinstall and FlashFig using a “mode script,” letting ISPs define the security state during initial flashing instead of pressing buttons on thousands of units.
Flagged state and provisioning pain
RouterOS can mark a device as flagged when it detects suspicious patterns (file tampering, persistence-like behavior) and enforces a stricter safe state. An attempt counter also locks further device-mode updates after repeated failed change attempts without physical confirmation. When counts look unexpected, investigate first — don’t enable more features to “make it work.”
The provisioning deadlock pattern: router boots in a restrictive mode, first-boot script needs /tool/fetch to download config, fetch is blocked, bootstrap fails, device never reaches the state where remote fix is possible. Newer provisioning workflows fix this through Netinstall/FlashFig mode scripts. Note that /system/reset-configuration does NOT reset device-mode on many models — “reset equals factory” assumptions can surprise you.
How to safely enable a needed feature
When you legitimately need a gated capability, use a predictable procedure:
-
Check current state:
/system/device-mode/print -
Request the change with a timeout:
/system/device-mode/update fetch=yes activation-timeout=10m -
Perform the physical confirmation — press the Mode/Reset button (model-dependent) or power-cycle the device with a cold reboot.
-
Verify:
/system/device-mode/print
If the timeout expires before confirmation, RouterOS discards the pending change and keeps the old policy.
Risk-based enabling matrix
| Capability | Typical legit need | Main risk | Safer approach |
|---|---|---|---|
fetch | Pull configs, renew certs | Remote payload delivery | Allow only to known HTTPS endpoints; restrict egress |
scheduler | Backups, maintenance jobs | Persistence | Keep scripts minimal; monitor for unexpected jobs |
socks | Internal tunneling | Botnet relay | Bind to management VLAN only; restrict by firewall |
traffic-gen / bandwidth-test | Link tests | DoS / amplification | Enable only during maintenance windows |
container | Run services on the router | Long-lived persistence | Prefer dedicated servers; harden storage and firewall |
Impact on MKController adoption
MKController depends on predictable management access; device-mode can be the invisible handbrake during onboarding. If it blocks a required action, the adoption flow stalls — the symptom often looks like “the device is reachable, but tasks fail.” The MKController troubleshooting guide highlights Device-Mode disabled specifically. Plan for it: include a device-mode policy in your staging checklist, decide which flags are allowed before shipping, and document how physical confirmation will happen at each site. For related security context, see our Winbox security best practices and WireGuard remote management guides.
Post-upgrade checklist
After every RouterOS upgrade or when receiving new hardware: confirm the current mode matches policy; validate tooling you depend on (fetch, scheduler); check allowed-versions in regulated environments; inspect attempt-count and flagged state for anomalies; document which sites require physical confirmation and how.
Take the next step
Device-mode is essential security infrastructure but adds operational overhead at scale, where physical confirmation across remote sites can’t be improvised. MKController centralizes inventory, access governance, and visibility so you only touch device-mode when justified, and the physical step is planned rather than reactive.