
Vincula un dispositiu MikroTik al teu hotspot
Resum Vincular un MikroTik connecta un router físic al teu voucher de WiFi Monetization (Monetització del Wi-Fi) perquè pugui servir el portal captiu. L’assistent de desplegament guiat tria la interfície, defineix una subxarxa IP i configura el hotspot, RADIUS, DHCP i el walled garden per tu, sense escriure scripts de RouterOS. S’admeten punts d’accés addicionals sempre que funcionin en mode bridge.
Què fa vincular un dispositiu?
Section titled “Què fa vincular un dispositiu?”Un voucher és la teva campanya de Wi-Fi; un dispositiu vinculat és el MikroTik que realment la transmet. Quan vincules un MikroTik, MKController desplega al router tot el que necessita el hotspot a través del túnel xifrat: la interfície del hotspot, la validació de presència RADIUS que valida l’accés, DHCP per a les adreces IP dels visitants i el walled garden que permet que la pàgina d’inici de sessió es carregui abans que un visitant s’autentiqui.
Pots vincular més d’un MikroTik al mateix voucher —útil quan una campanya cobreix diversos routers— i pots desvincular o transferir un dispositiu més endavant.
Abans de vincular
Section titled “Abans de vincular”- El MikroTik ja ha d’estar adoptat a MKController. Si no ho està, adopta’l primer: Afegeix el teu primer dispositiu MikroTik.
- Decideix quina interfície faran servir els visitants per connectar-se (per exemple, una interfície sense fils o un bridge que agrupi els teus punts d’accés).
- El dispositiu ha d’estar en línia a MKController perquè l’assistent pugui enviar la configuració.
Com vincular un dispositiu MikroTik
Section titled “Com vincular un dispositiu MikroTik”Pas 1: Obre la secció Dispositius
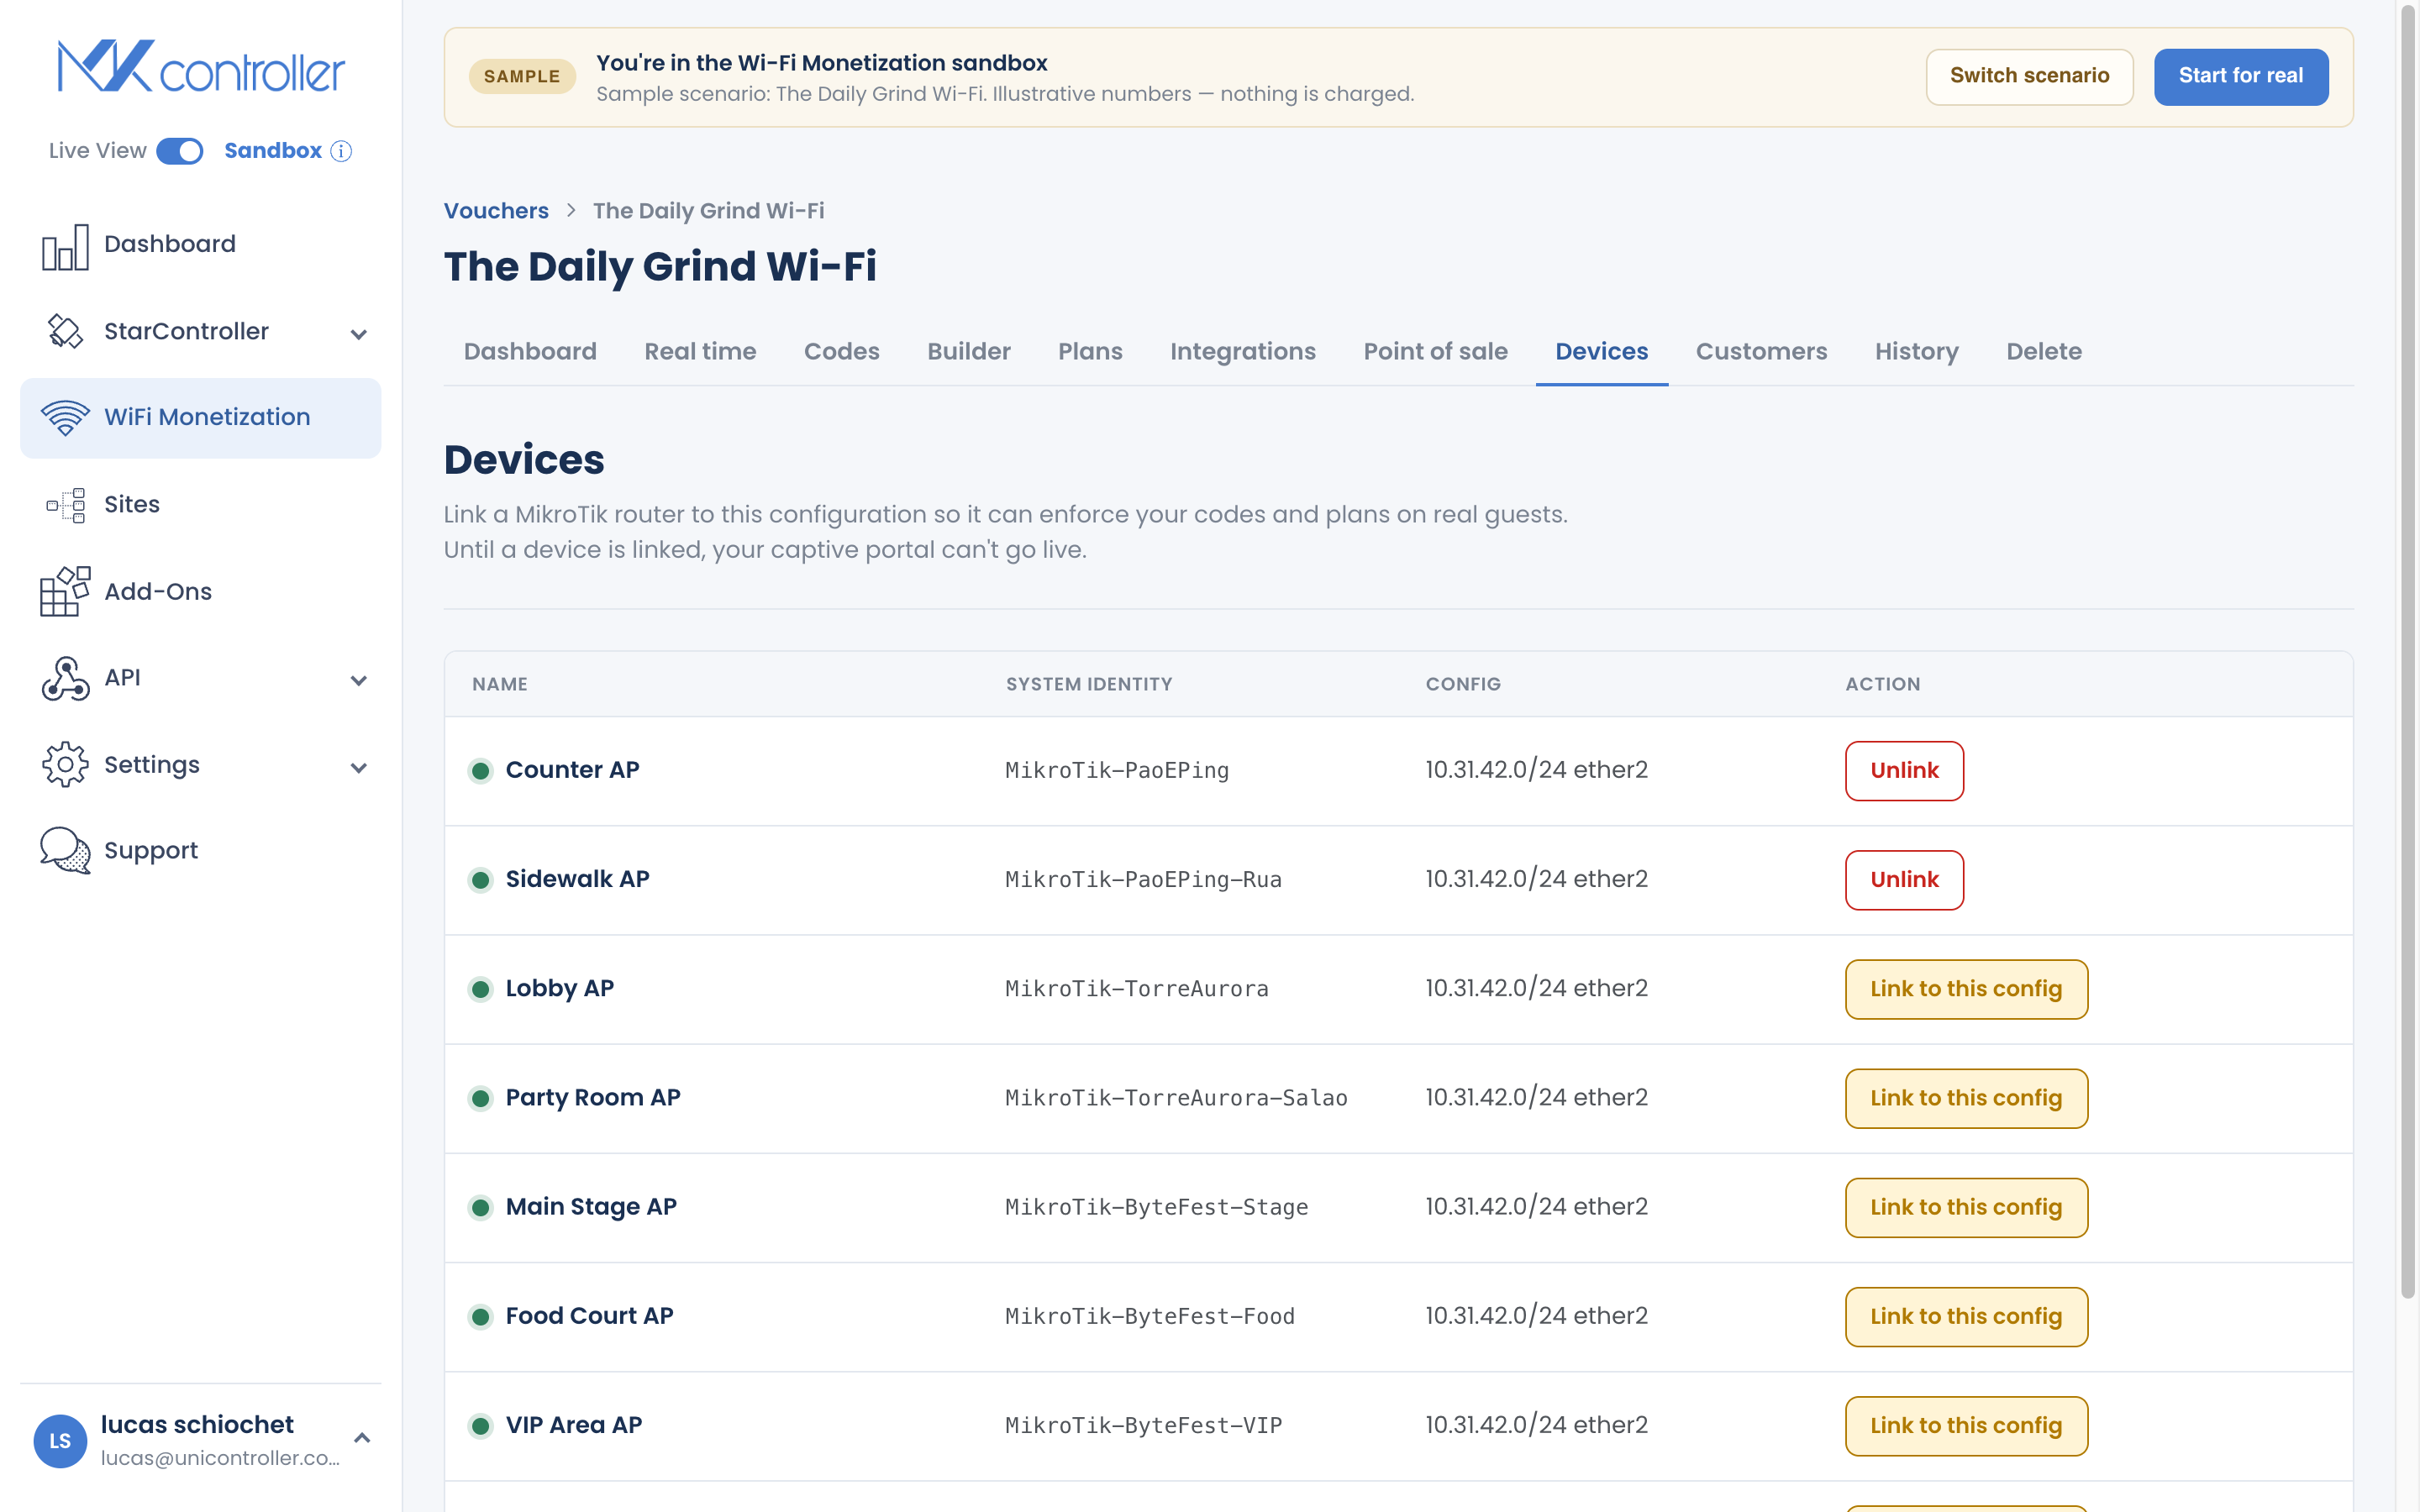
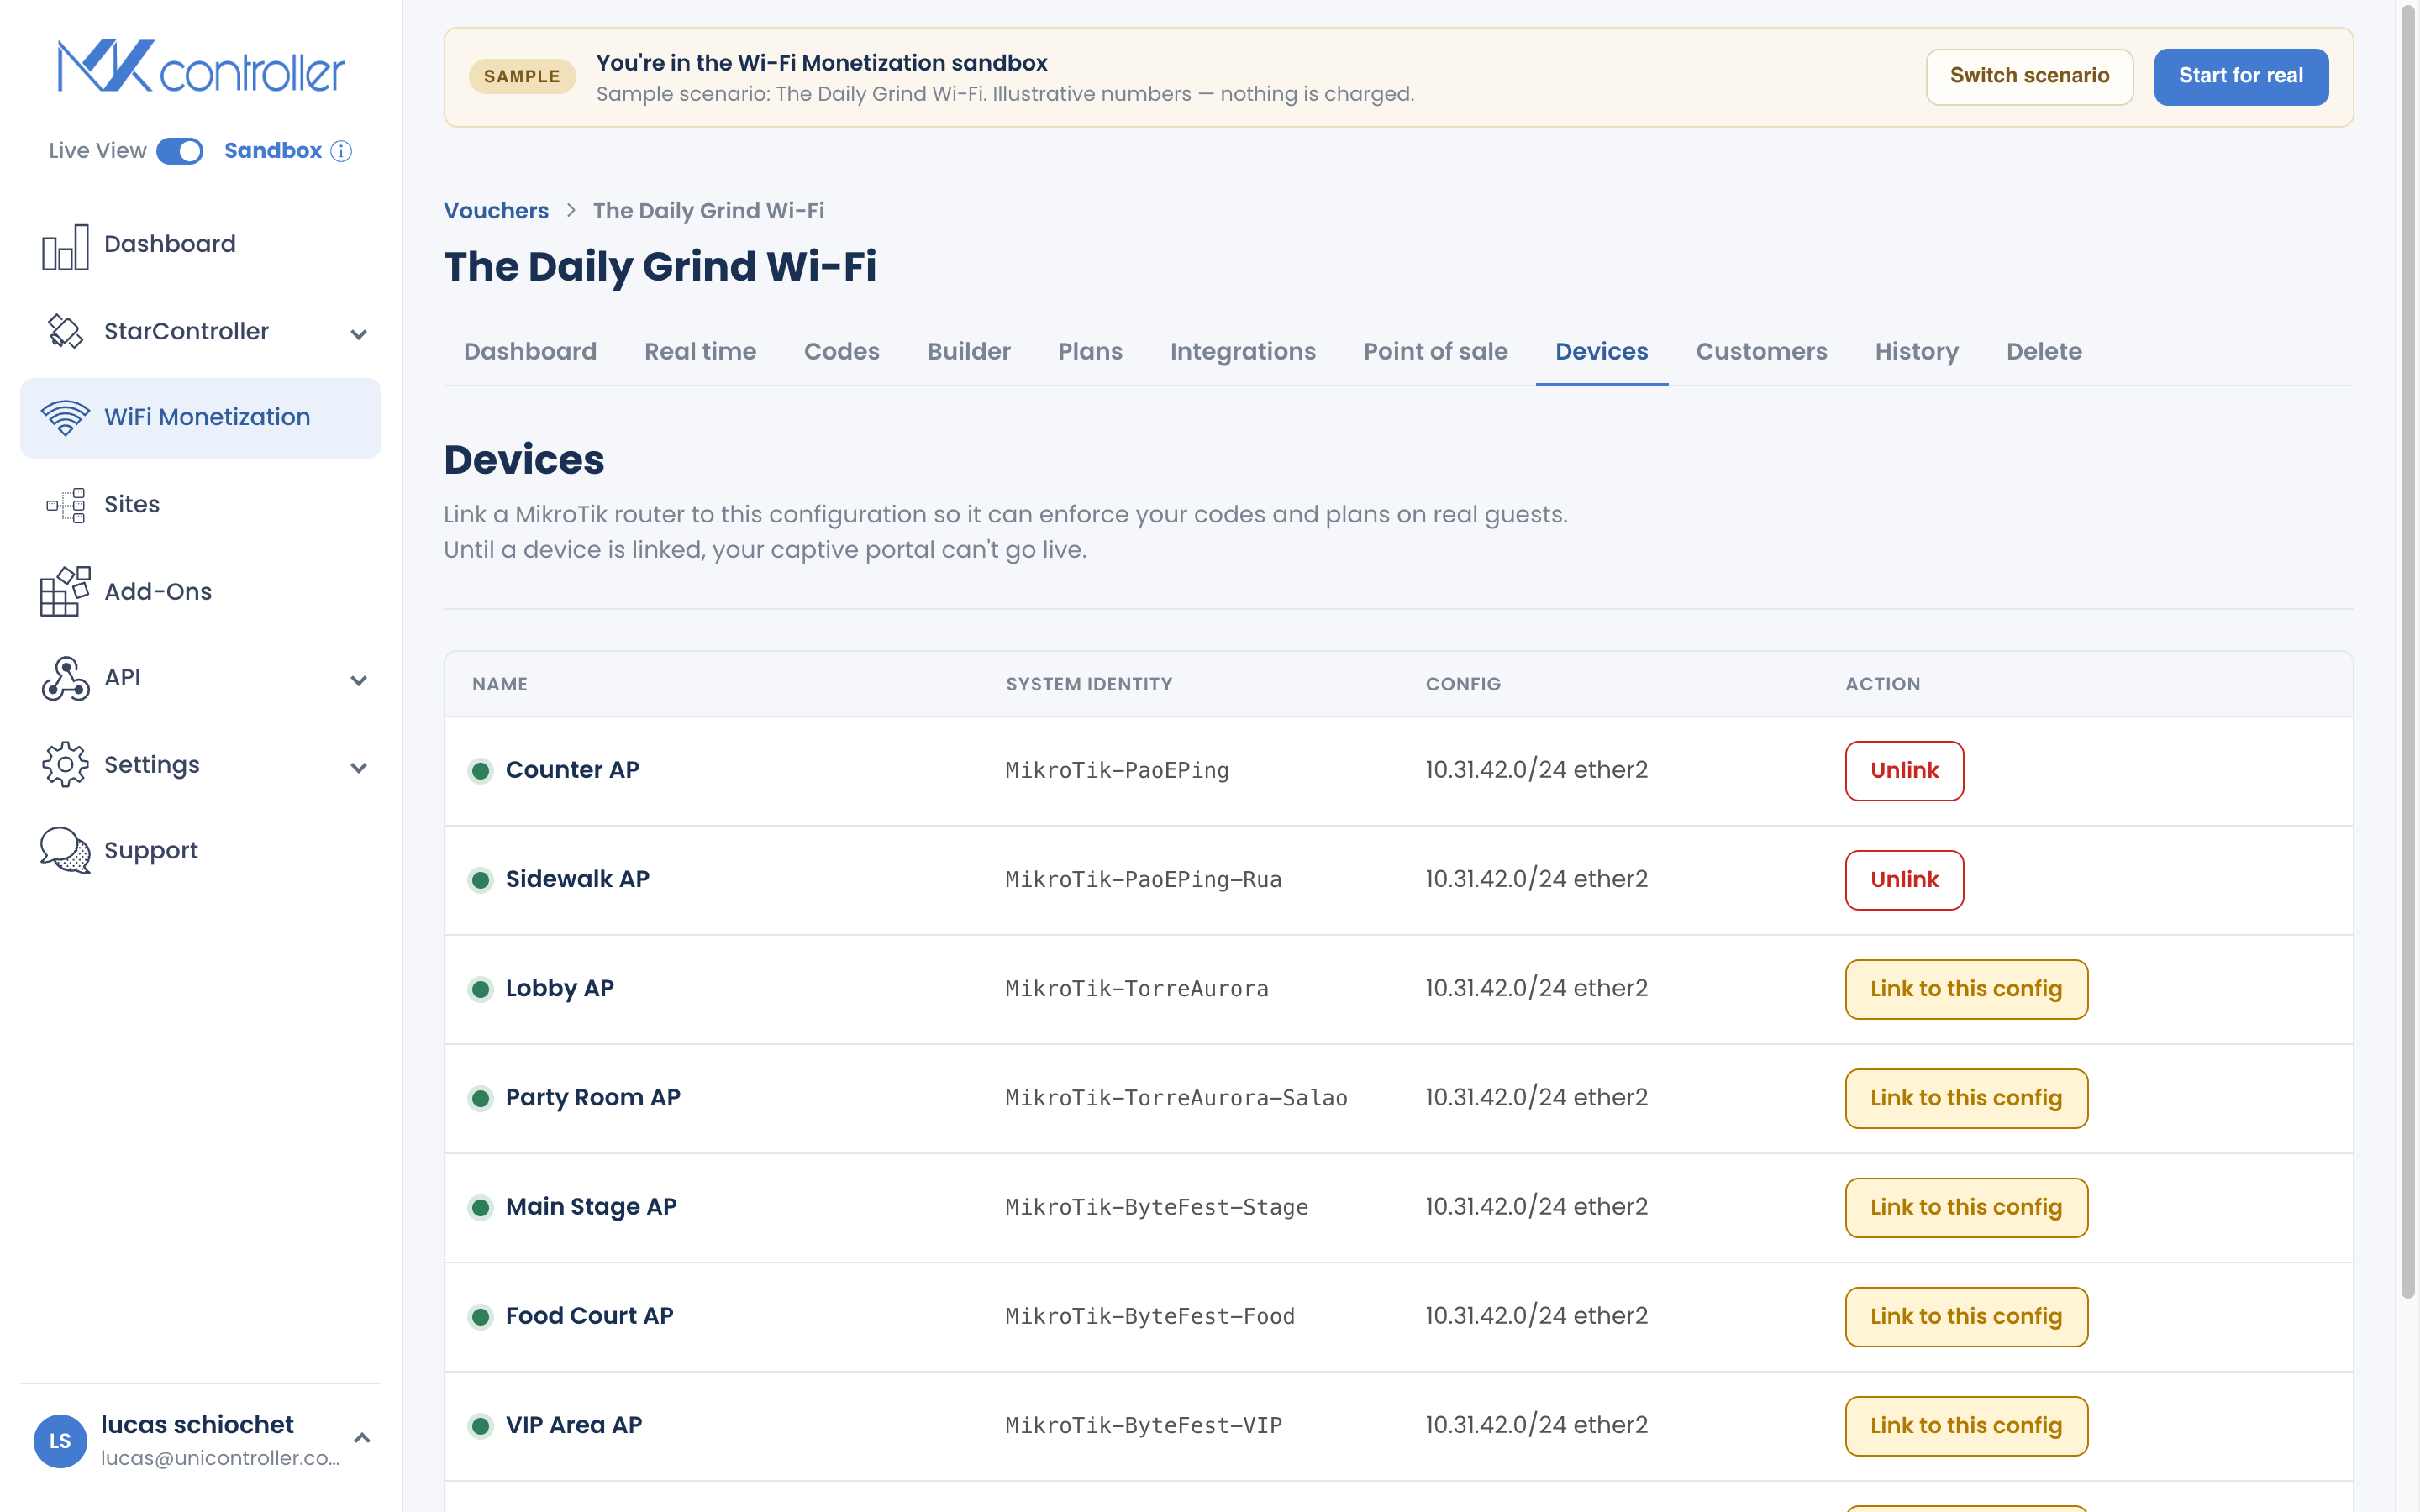
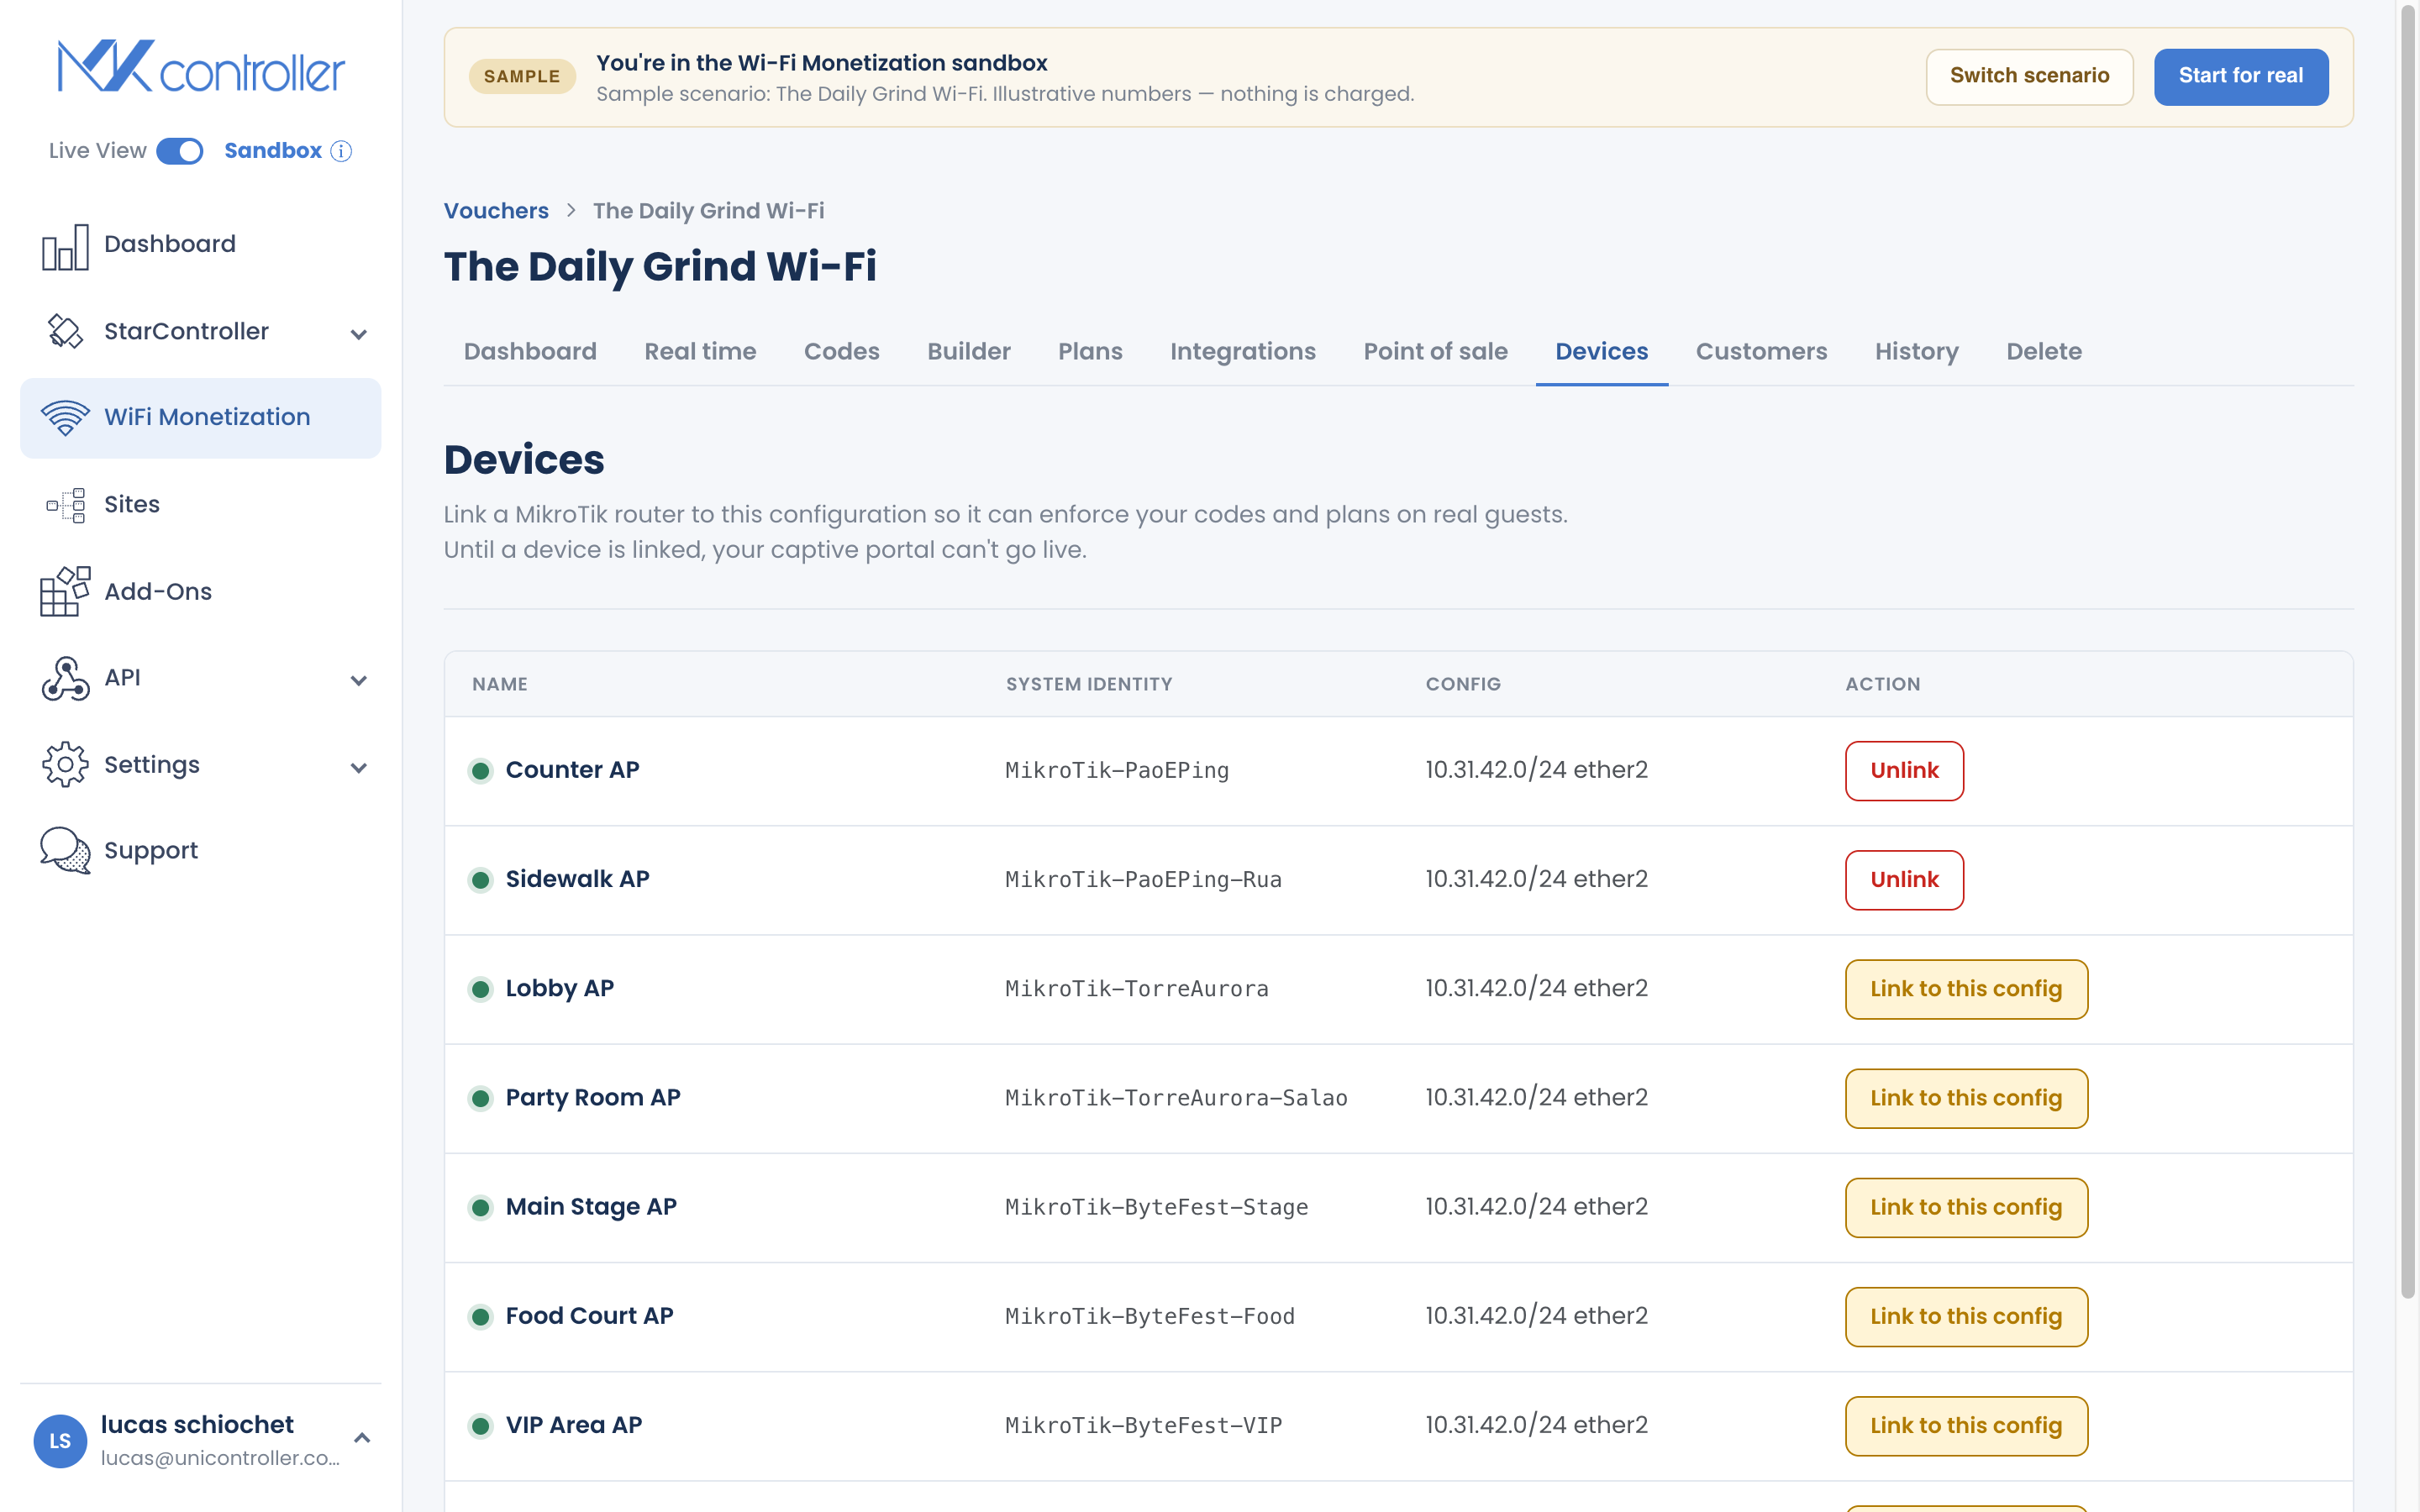
Section titled “Pas 1: Obre la secció Dispositius”Dins del teu voucher, obre la secció Dispositius. Mostra els MikroTiks ja vinculats a aquest voucher amb el seu estat en línia o fora de línia. Tria el dispositiu que vulguis vincular i inicia l’assistent de desplegament.
Pas 2: Tria la interfície
Section titled “Pas 2: Tria la interfície”L’assistent detecta automàticament les interfícies del router i suggereix la que haurien de fer servir els visitants. Si la teva configuració és poc habitual, canvia a la selecció manual i tria tu mateix la interfície.
Pas 3: Defineix la subxarxa
Section titled “Pas 3: Defineix la subxarxa”Mantén la subxarxa suggerida —el valor per defecte 10.31.42.1/24 funciona per a la majoria de desplegaments i t’ofereix 254 adreces per a visitants— o introdueix la teva pròpia si entra en conflicte amb una xarxa existent al router.
Pas 4: Executa el desplegament
Section titled “Pas 4: Executa el desplegament”Inicia el desplegament. L’assistent avança per passos esglaonats i mostra el progrés de cadascun:
- Fa una còpia de seguretat de la configuració actual del router (perquè no es perdi res).
- Configura la interfície.
- Configura RADIUS.
- Configura DHCP.
- Aplica el walled garden.
- Puja tot al dispositiu.
Espera que l’assistent arribi a Fet. El teu MikroTik ja està servint el portal captiu.
Ús de punts d’accés addicionals (mode bridge)
Section titled “Ús de punts d’accés addicionals (mode bridge)”A la pràctica: agrupa els teus punts d’accés en un bridge al MikroTik i vincula el hotspot a aquesta interfície de bridge al Pas 2. Així, un sol voucher cobreix tota l’àrea de cobertura.
Gestió de dispositius vinculats
Section titled “Gestió de dispositius vinculats”Des de la secció Dispositius pots:
- Vincular un altre MikroTik al mateix voucher.
- Transferir un dispositiu entre vouchers.
- Desvincular un dispositiu quan ja no vulguis que serveixi aquest hotspot.
Si el desplegament informa d’un error
Section titled “Si el desplegament informa d’un error”A diferència de la interfície anterior, l’assistent mostra els errors reals en lloc de mostrar un fals “fet”. Els dos més habituals:
- Error del sistema de fitxers — el router no ha pogut escriure els fitxers necessaris (sovint per poc espai lliure d’emmagatzematge). Allibera espai al MikroTik i torna-ho a provar.
- Error de script — un pas de la configuració no s’ha pogut aplicar (per exemple, un conflicte d’interfície o d’adreça). Revisa l’elecció d’interfície i la subxarxa, i torna-ho a provar.
Reintentar reenvia la configuració; el dispositiu només es marca com a vinculat un cop confirma l’èxit.
Preguntes freqüents
Section titled “Preguntes freqüents”Pot un voucher fer servir diversos MikroTiks? Sí. Vincula’n tants com necessitis al mateix voucher. Cadascun apareix a la secció Dispositius amb el seu propi estat en línia.
Puc fer servir punts d’accés addicionals? Sí: configura’ls com a bridges, no com a routers, i vincula el hotspot a la interfície de bridge. Així, un sol voucher funciona a tots ells.
Vincular canvia altres ajustos del meu router? L’assistent afegeix la configuració de hotspot, RADIUS, DHCP i walled garden, i fa una còpia de seguretat del router primer. La teva configuració existent es manté intacta.
Què passa quan desvinculo un dispositiu? S’elimina la configuració de hotspot i RADIUS desplegada per MKController. El router continua funcionant; simplement deixa de servir aquest portal captiu.
Explora a continuació: Dissenya el teu portal captiu · Crea i imprimeix codis de voucher · Primers passos de WiFi Monetization · Preguntes freqüents de WiFi Monetization
Necessites ajuda per vincular un dispositiu? Parla amb el nostre equip per WhatsApp o crea el teu compte gratuït de MKController.