
Adoptar un Dispositivo UniFi en MKController
Resumen Adoptar un dispositivo UniFi en MKController conecta tu hardware Ubiquiti a un controlador alojado en la nube, eliminando la necesidad de un servidor controlador UniFi local. Hay dos métodos disponibles: el Asistente de Adopción escanea automáticamente en busca de dispositivos en la misma red que un router MikroTik adoptado, mientras que el método Manual funciona en cualquier red usando un comando set-inform por SSH.
¿Qué Significa Adoptar un Dispositivo UniFi en MKController?
Section titled “¿Qué Significa Adoptar un Dispositivo UniFi en MKController?”Adoptar un dispositivo UniFi en MKController significa apuntar el dispositivo al controlador UniFi alojado en la nube de MKController usando el comando set-inform. Una vez adoptado, el dispositivo aparece en el panel unificado de MKController junto con cualquier dispositivo MikroTik que gestiones — sin necesidad de software o servidor controlador UniFi local.
MKController es compatible con puntos de acceso, switches y gateways de Ubiquiti. El módulo UniFiController forma parte de la plataforma más amplia de MKController, lo que permite a ISPs, WISPs e integradores de TI gestionar redes mixtas de MikroTik y UniFi desde una única interfaz.
¿Cuáles Son los Requisitos?
Section titled “¿Cuáles Son los Requisitos?”Antes de empezar, confirma lo siguiente:
- Tienes una cuenta MKController activa con al menos un dispositivo MikroTik adoptado.
- Tienes acceso físico o remoto al dispositivo UniFi que quieres adoptar.
- El dispositivo UniFi tiene conectividad a internet.
¿Qué Método de Adopción Deberías Usar?
Section titled “¿Qué Método de Adopción Deberías Usar?”| Método | Cuándo usarlo |
|---|---|
| Asistente de Adopción (recomendado) | El dispositivo UniFi y tu dispositivo MikroTik están en la misma red |
| Adopción Manual | Los dispositivos están en redes diferentes, o prefieres un enfoque paso a paso |
Método 1: Asistente de Adopción (Asistido por IA, Recomendado)
Section titled “Método 1: Asistente de Adopción (Asistido por IA, Recomendado)”El Asistente de Adopción escanea la red donde se encuentra tu MikroTik, encuentra dispositivos UniFi compatibles y te permite adoptarlos con un solo clic.
Requisitos para el Asistente de Adopción
Section titled “Requisitos para el Asistente de Adopción”- El dispositivo UniFi está en la misma red que un dispositivo MikroTik ya adoptado.
- Ese MikroTik está accesible y en línea en MKController.
Paso 1: Abrir el Asistente de Adopción
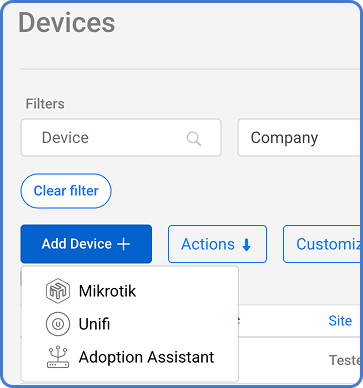
Section titled “Paso 1: Abrir el Asistente de Adopción”En el área de Dispositivos de tu cuenta MKController, haz clic en Agregar Dispositivo + y luego selecciona Asistente de Adopción.
Paso 2: Deja que el Sistema Escanee
Section titled “Paso 2: Deja que el Sistema Escanee”MKController usa el MikroTik adoptado en la misma red para escanear en busca de dispositivos UniFi cercanos. Espera los resultados.
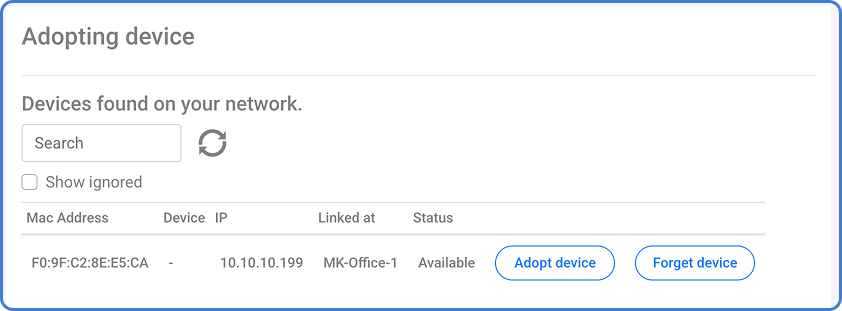
Cuando el dispositivo aparezca, haz clic en Adoptar Dispositivo.
Paso 3: Configurar el Dispositivo
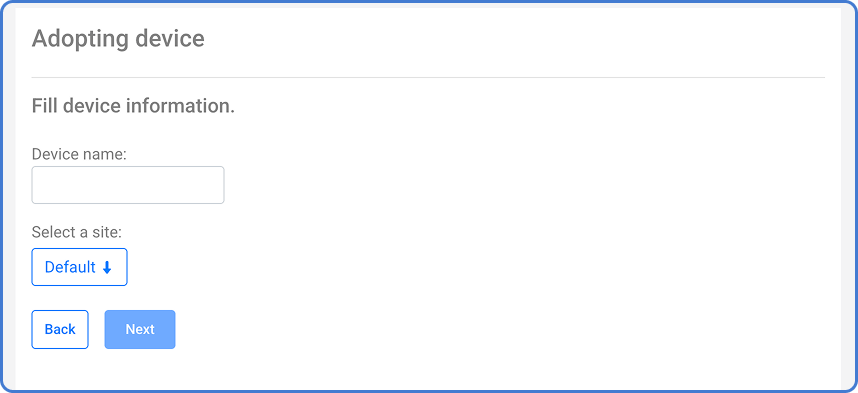
Section titled “Paso 3: Configurar el Dispositivo”Asigna un nombre para mostrar al dispositivo y selecciona un Sitio para organizarlo.
Paso 4: Completar la Adopción
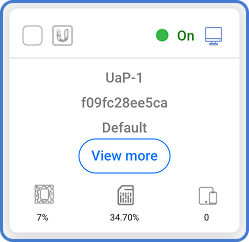
Section titled “Paso 4: Completar la Adopción”Espera a que el proceso de adopción finalice. Una vez completado, el dispositivo está activo en tu panel de MKController.
Método 2: Adopción Manual
Section titled “Método 2: Adopción Manual”Usa este método cuando el dispositivo UniFi y el MikroTik están en redes diferentes, o cuando prefieres tener control directo sobre el proceso de adopción.
Paso 1: Iniciar la Adopción Manual
Section titled “Paso 1: Iniciar la Adopción Manual”En el área de Dispositivos, haz clic en Agregar Dispositivo + y selecciona Unifi.
Paso 2: Crear el Registro del Dispositivo
Section titled “Paso 2: Crear el Registro del Dispositivo”Asigna un nombre al dispositivo, selecciona un Sitio e ingresa la dirección MAC del dispositivo.
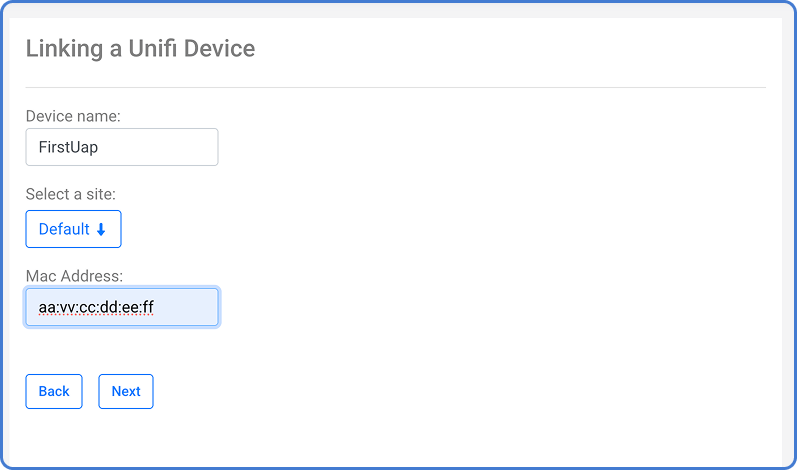
Paso 3: Ejecutar el Comando set-inform
Section titled “Paso 3: Ejecutar el Comando set-inform”Tras completar el Paso 2, MKController proporciona un comando set-inform específico para tu controlador.
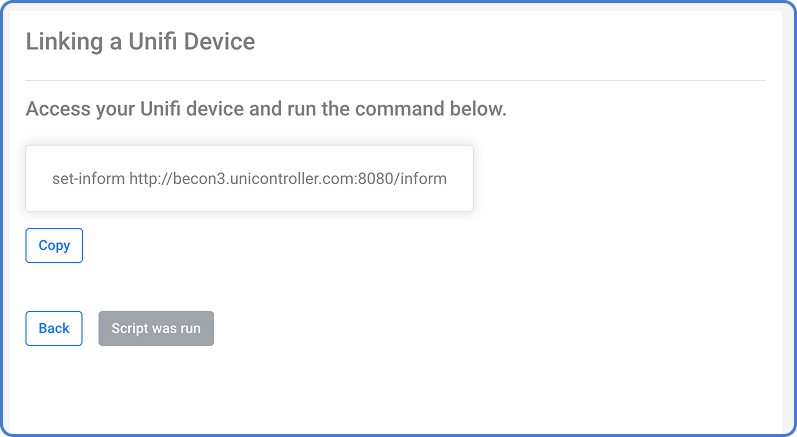
Accede al dispositivo UniFi por SSH y ejecuta ese comando. Si el dispositivo está conectado a un MikroTik, puedes usar el MikroTik como host de salto:
/system ssh <antenna-IP> user=<USER>Para dispositivos UniFi con configuración de fábrica, el nombre de usuario y la contraseña de SSH son ambos ubnt.
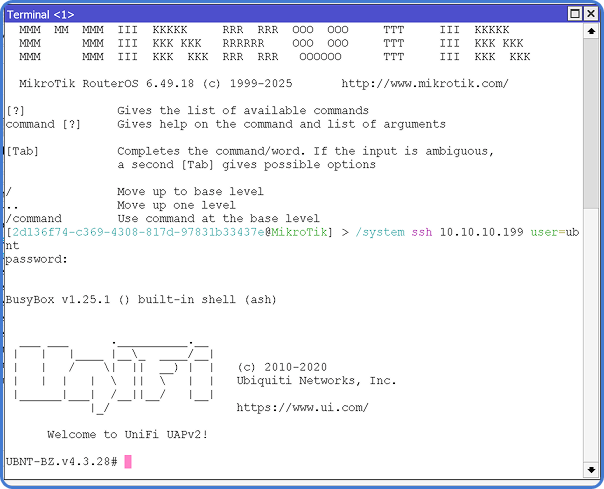
Paso 4: Completar la Adopción
Section titled “Paso 4: Completar la Adopción”Espera a que el proceso finalice. Una vez que el dispositivo UniFi contacta con el controlador de MKController, la adopción se completa y el dispositivo aparece en tu panel.
¿Qué Puedes Hacer Después de la Adopción?
Section titled “¿Qué Puedes Hacer Después de la Adopción?”Una vez adoptados, tus dispositivos UniFi son visibles en el mismo panel de MKController que tus dispositivos MikroTik. Desde aquí puedes monitorear la conectividad, aplicar actualizaciones, asignar etiquetas y ubicaciones, y acceder a la integración con la app móvil de UniFi para gestión sobre la marcha.
¿Preguntas sobre la adopción de UniFi? Contacta con el soporte de MKController por WhatsApp — nuestro equipo responde rápidamente y puede ayudarte con desafíos de topología de red.
¿Preguntas? 📧 contato@mkcontroller.com