How to adopt a Device
Having a adopted MikroTik is a crucial part of MKController’s experience. All of our features require an adopted device to work. In this manual, you’re gonna learn how to adopt an device on different scenarios and get started on your MKController journey.
Requirements
Before starting please make sure all of the requirements below are met:
You or a partner must have access to the Mikrotik you want adopt.
The Mikrotik you want to adopt must have connection to the internet.
Does my Mikrotik has internet connection?
Test connectivity using the ping feature (in this example, the test was performed with “ping 8.8.8.8”).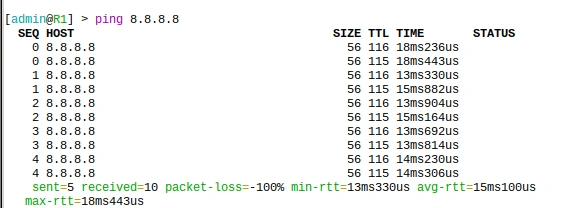
DNS Name Resolution.
Can my Mikrotik resolve domain names through DNS?
Use the ping command (in this example, the test was performed with “ping google.com”) to verify if the device can resolve names.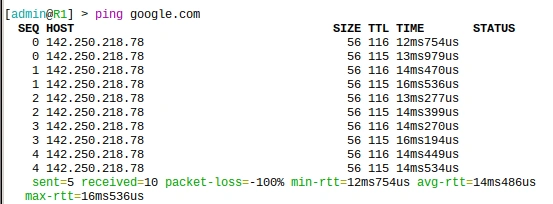
The Mikrotik you want to adopt must be under are supported OS versions.
Have an active MKController account.
How does it work and why it’s safe
The process of adopting Mikrotik on the MKController platform is an essential procedure that establishes a secure connection between your equipment and the centralized management system. This integration is performed through an encrypted VPN connection between the MKController servers and the Mikrotik device, ensuring a secure and reliable communication channel.
This security architecture allows remote control, continuous monitoring and application of automated configurations, even when the devices are on different networks or behind firewalls. Although the process is technically simple, each step must be executed correctly to ensure a stable and functional connection.
Adopting a Mikrotik
1. On a logged in account, click on the “Add device” button to start the adoption process.

2. Choose a desired device name. This is a simple display name and be changed anytime you desire.

3. Now you can select how you want to adopt your Mikrotik by choosing a adoption helper option. This is not a permanent choice, you can always go back and try another way if you like.

You can follow the adoption helper on the platform to guide you through the proccess or stay on this tutorial and select one of the options below:
Link via Webfig - We will guide you on how to link your device using Webfig.
1. On your browser, access your device using its IP address.
- When connected via cable, it is usually 192.168.88.1.

2. Accessing the scripts menu.
- After logging into your device, look for the System option in the side menu. Click on it and then go to Scripts.

3. Creating a new webfig script.
- Once inside the Script function, click the “Add New” button to create a new script.
- Copy the script provided by MKController and paste it into the ‘source’ field. Then, click Apply.
- You can generate a MKController Adoption Script by selecting the “Link via Script” option on the Adoption Helper or follow the “Link via Webfig” steps option on the Adoption Helper.

4. Executing the script.
- Run the webfig script created in the previous step and wait until the process is complete.

5. How to know if the script worked properly?
- All of the adoption helper final steps contain this following message:

- When your Mikrotik establishes connection to our server, the message showed above will change to a progress section, wich will visually inform you step by step about the adoption progress:
 (After your Mikrotik establishes connection to our server, the user need’s to wait untill the process showed above be completed)
Link via Winbox - We will guide you on how to link your device using Winbox.
1\. Accessing the device. - Open Winbox and connect to your device.
2. Accessing the scripts menu.
- After logging into your device, look for the System option in the side menu. Click on it and then go to Scripts.
3. Creating a new webfig script.
- Once inside the Script function, click the “Add New” button to create a new script.
- Copy the script provided by MKController and paste it into the ‘source’ field. Then, click Apply.
- You can generate a MKController Adoption Script by selecting the “Link via Script” option on the Adoption Helper or follow the “Link via Winbox” steps option on the Adoption Helper.
4. Executing the script.
- Run the webfig script created in the previous step and wait until the process is complete.
5. How to know if the script worked properly?
- All of the adoption helper final steps contain this following message:
- When your Mikrotik establishes connection to our server, the message showed above will change to a progress section, wich will visually inform you step by step about the adoption progress:
(After your Mikrotik establishes connection to our server, the user need’s to wait untill the process showed above be completed)
Link via SSH - We will guide you on how to link your device using the terminal.
1. Accessing the device
- Open the terminal on your computer/operating system and connect via SSH.
- The default access is usually admin@(yourIP).
- If the device has a password, it will also be required.

2. Executing the script.
- Copy the script provided by MKController and run it on the terminal. Then wait until the process is complete.
- You can generate a MKController Adoption Script by selecting the “Link via Script” option on the Adoption Helper or follow the “Link via SSH” steps option on the Adoption Helper.

3. How to know if the script worked properly?
- All of the adoption helper final steps contain this following message:
- When your Mikrotik establishes connection to our server, the message showed above will change to a progress section, wich will visually inform you step by step about the adoption progress:
(After your Mikrotik establishes connection to our server, the user need’s to wait untill the process showed above be completed)
Next Steps
Congratitulations! Now that you’ve adopted your first Mikrotik we can show you one of MKController’s core features: Remote Access.
- There are 3 ways you can start a remote access on our platform. They all start on the devices tab:

Access through table mode.

Access through card mode.

Access through device details.

Removing a Mikrotik
Efficient network device management is fundamental to maintaining organization and control over the IT environment. Occasionally, the need arises to remove MikroTik devices from the management system, whether due to equipment replacement, infrastructure reorganization, or simply to clean up obsolete records.
The “Forget device” functionality allows administrators to permanently remove MikroTik device representations from the system, ensuring that only active and relevant equipment remains in the inventory. This process is irreversible and must be executed carefully, as all configurations and histories associated with the devices will be lost.
Removing MikroTik Devices in MKController
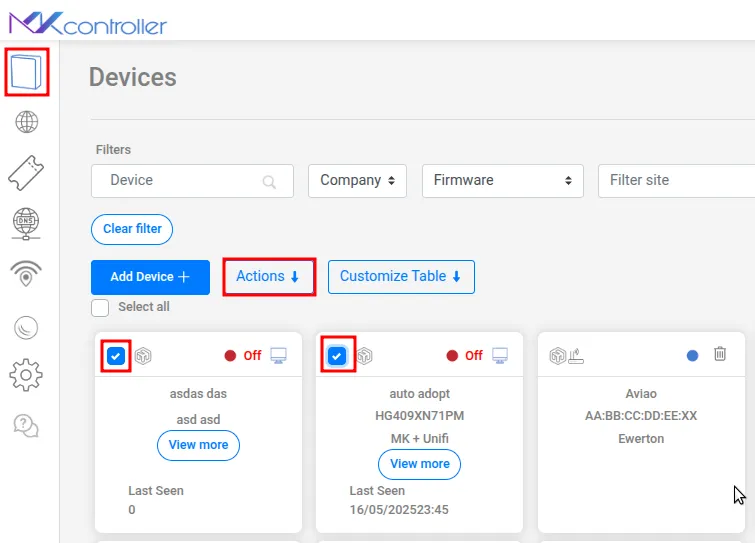
In the Devices menu, locate and select one or more representations of the MikroTik device you wish to remove. For this example, two device representations were selected.
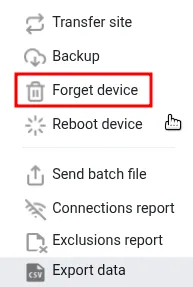
With the devices selected, click the Action button to access the available options.
In the dropdown menu that appears, select the “Forget device” option.
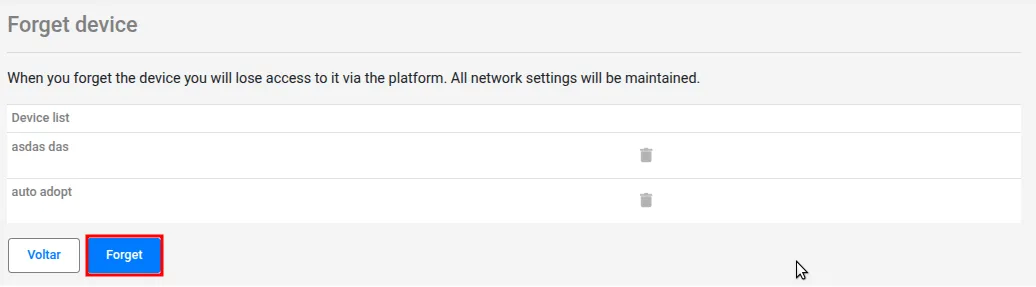
The system will present a confirmation screen displaying the names of the MikroTik device representations that will be removed. Carefully verify that the listed devices are indeed the ones you wish to delete.
Then, select the “Forget” button.
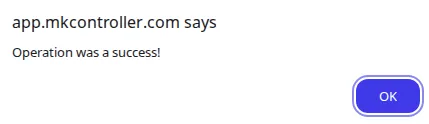
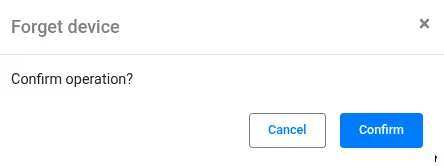
A new confirmation screen will be displayed. To proceed with the definitive removal of the devices, click the “Confirm” button.
After the operation is processed, the system will display the message “The Operation was a success”. Select OK to finalize the process.