
Design Your MikroTik Captive Portal (Builder)
Summary The Builder is the visual designer for your captive portal — the login page guests see when they join your Wi-Fi. Add your logo, welcome text, terms, and a marketing image, and choose which details to collect, all with a live phone preview beside you. When you are done, a test-as-a-guest simulator lets you walk the entire flow before any real guest sees it. No coding required.
What Is the Captive Portal Builder?
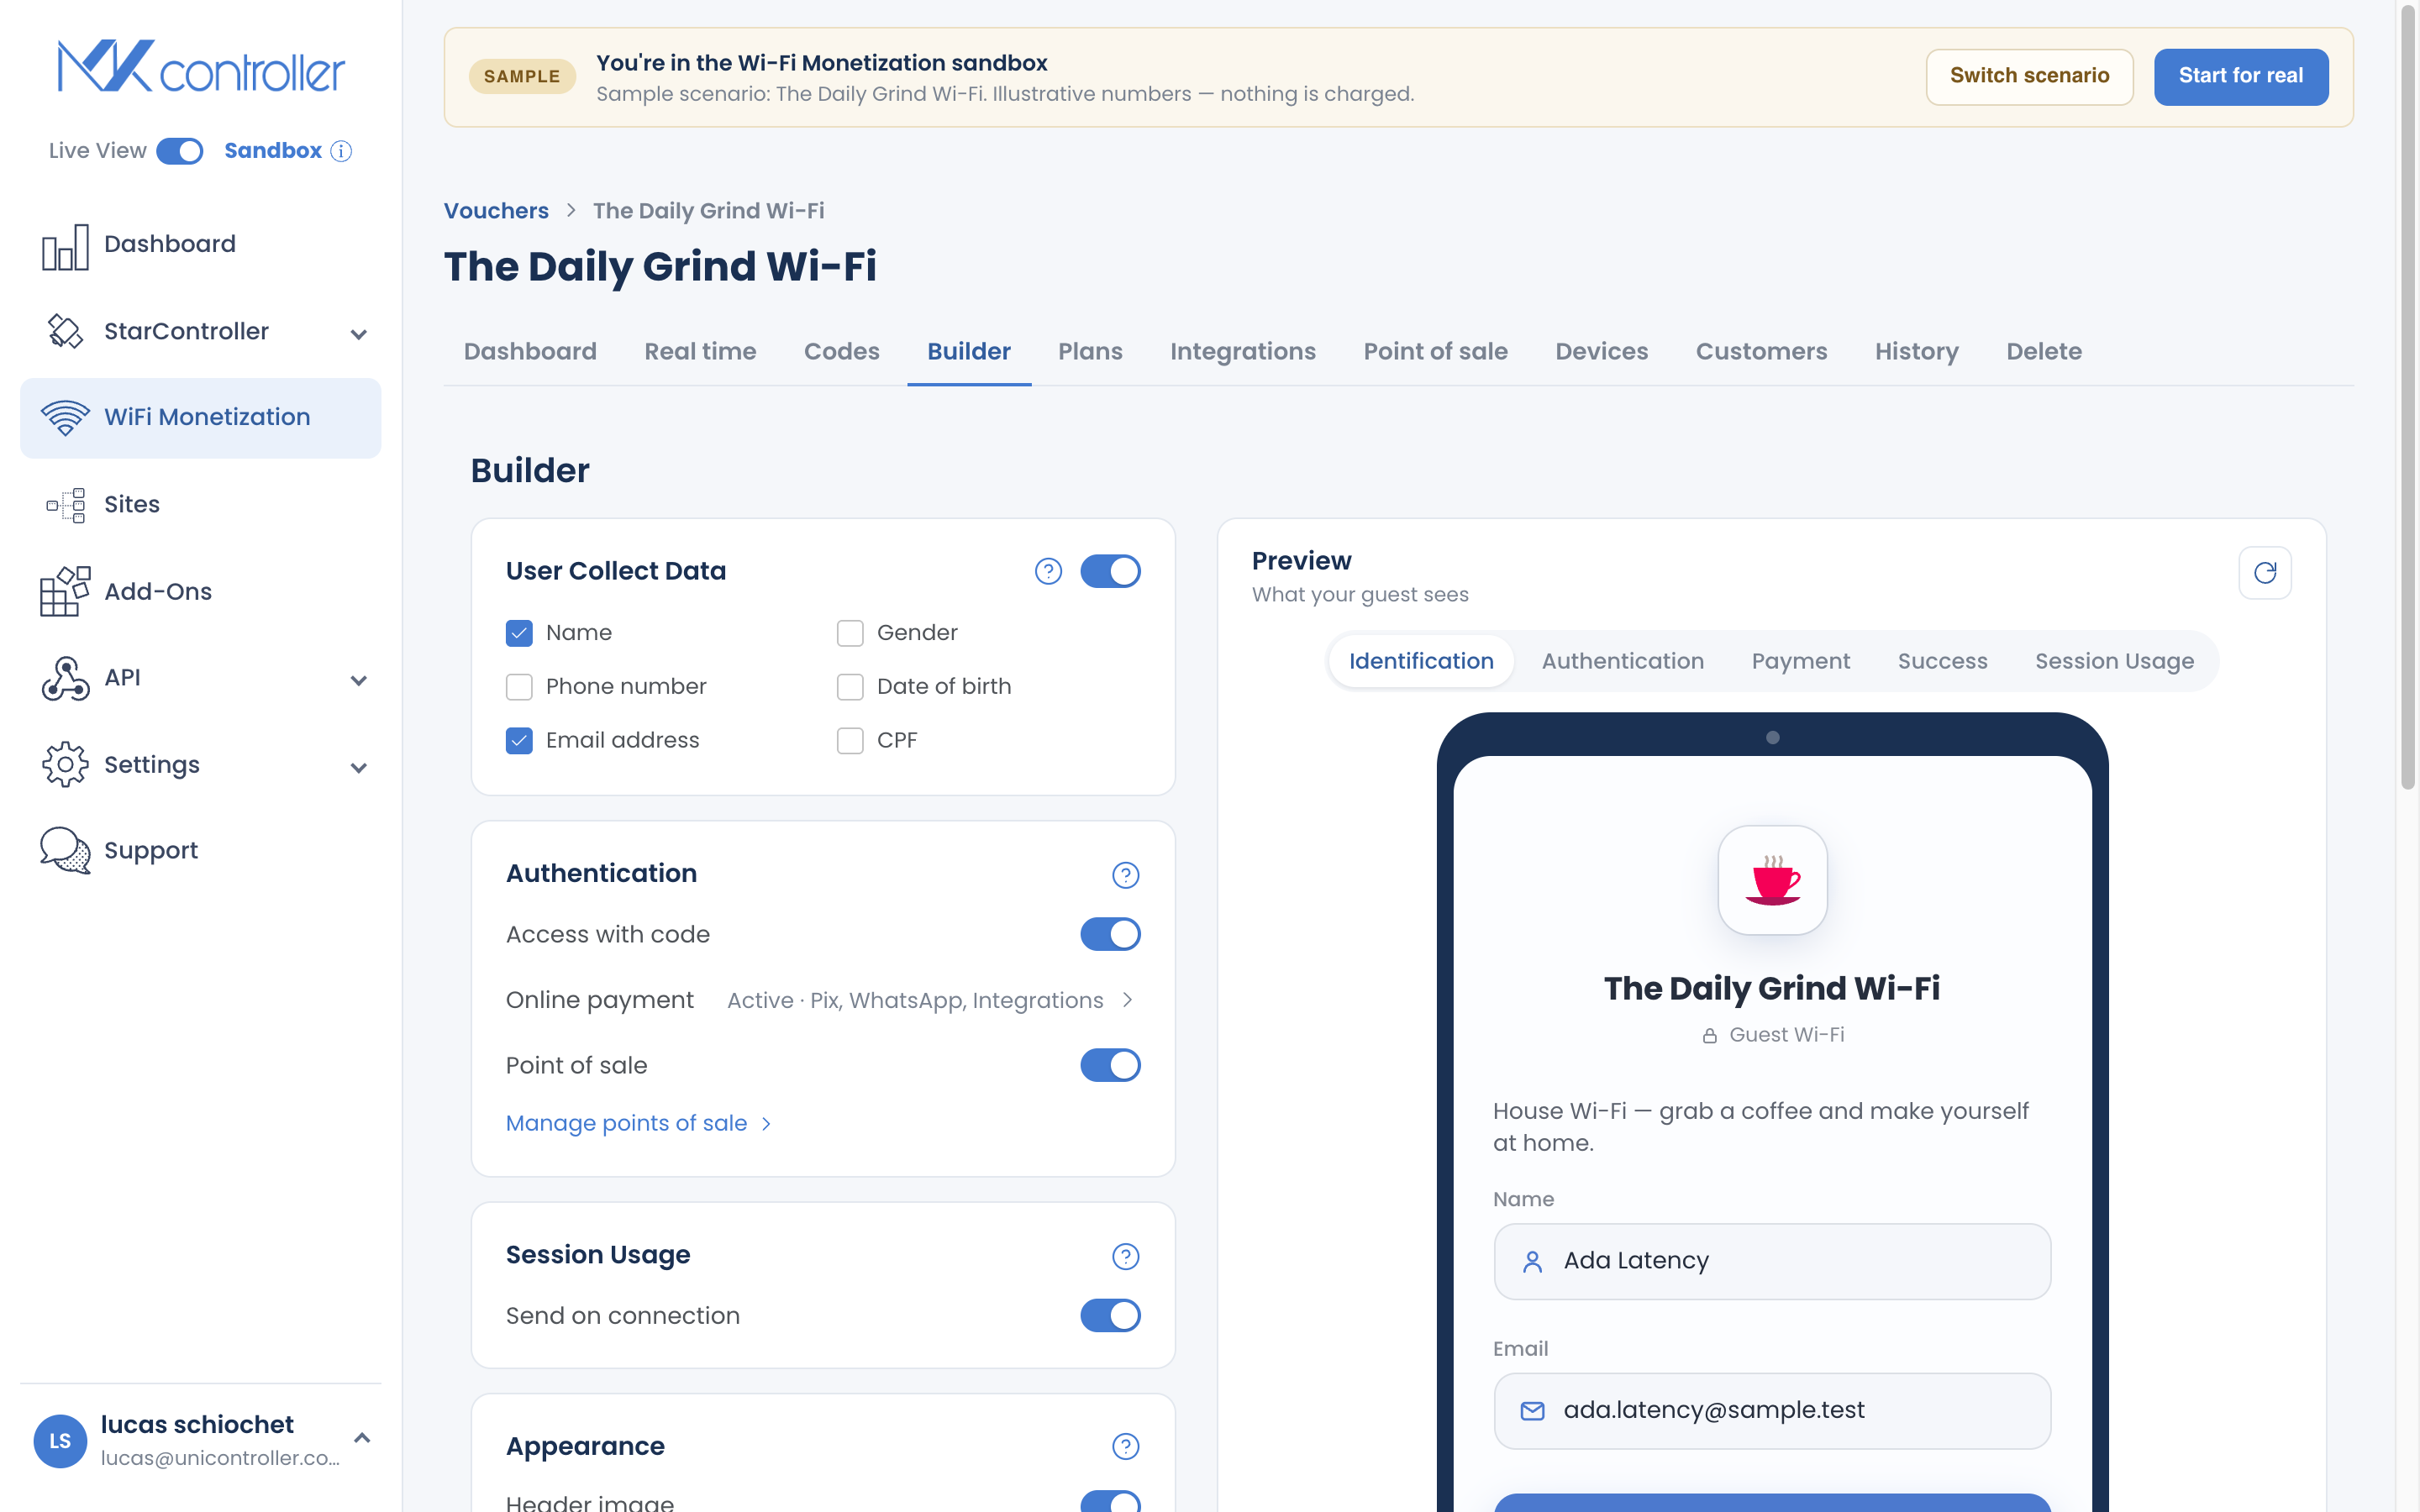
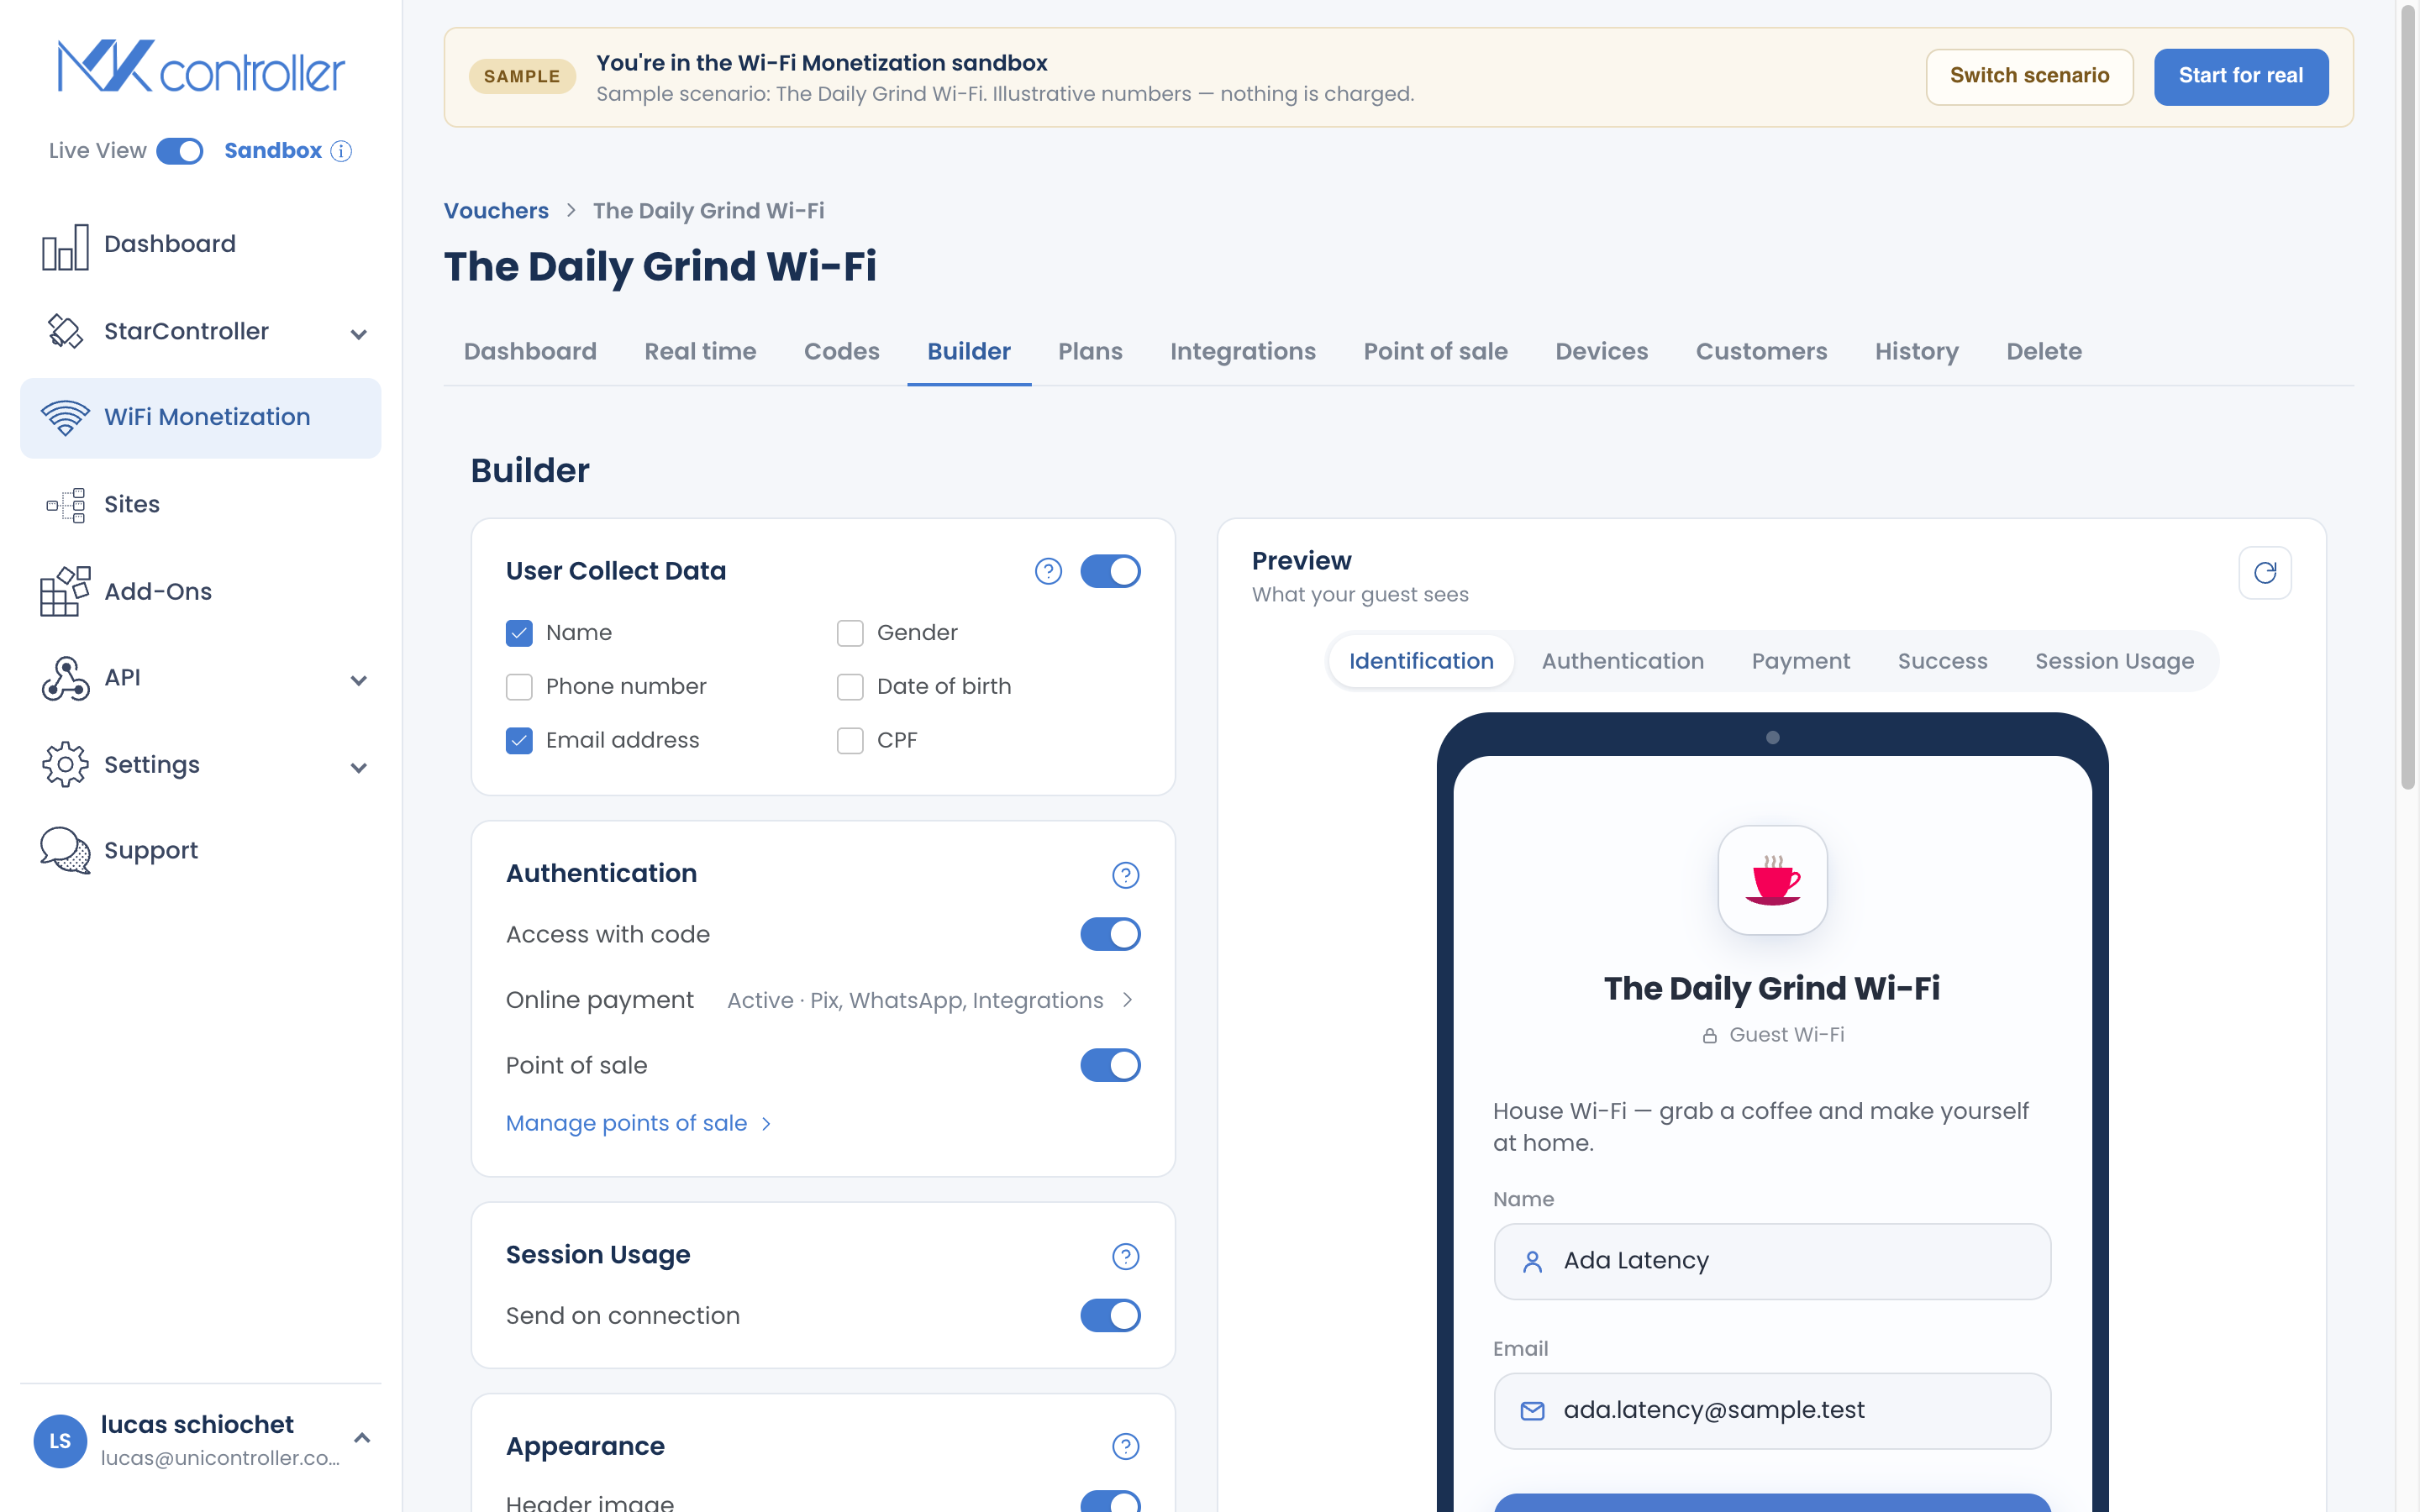
Section titled “What Is the Captive Portal Builder?”The Builder is where you design the branded page guests land on before they get online. It has two halves: on the left, the configuration rows where you turn features on and set them up; on the right, a live phone preview that updates as you edit, so you always see what a guest will see.
The preview has stage tabs that mirror the real guest journey — personal data, code entry, payment, success, and the status page — so you can check every screen, not just the first one.
What Can You Customize?
Section titled “What Can You Customize?”- Logo — shown on every guest screen.
- Welcome message — a short line under the logo (your name, an offer, or a greeting).
- Terms of use — a checkbox plus a link guests can open before connecting.
- Marketing image — a larger banner on the access and success screens.
- Personal-data collection — turn it on and choose which fields to ask for: name, phone, email, CPF, gender, and birthdate.
Each configuration row expands inline only while it is switched on, so the panel stays uncluttered.
How to Design Your Captive Portal
Section titled “How to Design Your Captive Portal”Step 1: Open the Builder
Section titled “Step 1: Open the Builder”Open your voucher and select the Builder section. If you just created the voucher, you are already here.
Step 2: Add your logo
Section titled “Step 2: Add your logo”Upload your logo. It appears immediately in the preview at the top of every guest screen. Use a clear image with some transparency for the best result on the branded background.
Step 3: Add a welcome message and terms
Section titled “Step 3: Add a welcome message and terms”Write a short welcome message — one line is enough. Then add your terms of use: guests must tick the checkbox to continue, and can open the full text from the link.
Step 4: Add a marketing image (optional)
Section titled “Step 4: Add a marketing image (optional)”Add a marketing image if you want a larger banner — a promotion, a sponsor, or a photo of your venue — on the access and success screens.
Step 5: Choose which guest details to collect
Section titled “Step 5: Choose which guest details to collect”Turn on personal-data collection and select only the fields you actually need.
Step 6: Connect online payment (optional)
Section titled “Step 6: Connect online payment (optional)”To sell access on the portal itself, switch on Online payment. This takes you to the Payment Methods screen, where you enable Pix, a card or mobile-money gateway, or WhatsApp. See Receive Pix Payments and Configure Payment Gateways.
Preview and Test as a Guest
Section titled “Preview and Test as a Guest”The live preview on the right updates as you edit. Use the stage tabs to check each screen a guest will pass through — personal data, code, payment, success, and status.
When the design looks right, use “Simular acesso” (test as a guest) to open the real captive portal in a phone frame and walk the whole flow — enter a code, choose a plan, and view the status page — with safe test data and no real charges. It is the fastest way to catch a confusing label or a missing field before you go live.
Design Choices That Convert
Section titled “Design Choices That Convert”The Builder is easy to fill in; the harder question is what to put on the page. Use the guidance below, then confirm it with the “test as a guest” simulator.
Which guest details should I collect?
Section titled “Which guest details should I collect?”Only ask for a field if you will use it. Every extra field is one more step before a guest gets online — and more personal data for you to safeguard.
| Your goal | Collect | Skip |
|---|---|---|
| Fastest connection (free/community Wi-Fi) | Nothing, or name only | Everything else |
| Follow up a sale or send the receipt | Name + phone (or email) | Gender, birthdate |
| Marketing list with consent | Name + email + a clear opt-in in your terms | CPF, birthdate |
| Formal receipts in Brazil | Add CPF | Fields you will not use |
When in doubt, collect less. You can always add a field later if a real need appears.
Write a welcome message that sets the tone
Section titled “Write a welcome message that sets the tone”One clear line does more than a paragraph. A few patterns that work:
- Café / bar: “Welcome to [Name] — grab a pass and enjoy fast Wi-Fi.”
- Condo / building: “Resident and guest Wi-Fi for [Building]. Choose a plan to connect.”
- Event: “[Event] Wi-Fi — pick a day pass and you’re online in seconds.”
Make the page work harder
Section titled “Make the page work harder”Small additions that pay off:
- Add a marketing image to promote a plan, a sponsor, or your loyalty offer on the success screen — guests see it right after they connect.
- Use your terms of use to state the essentials plainly (fair-use, data handling). It builds trust and covers you.
- Keep it honest. Real offers, real information — no fake countdowns or forced urgency. Trust is what turns a first sale into a repeat one.
Before you publish
Section titled “Before you publish”Run “test as a guest” and walk the whole flow on a phone-sized screen. If anything makes you pause, it will make a guest pause too — fix it now, while it costs nothing.
Frequently Asked Questions
Section titled “Frequently Asked Questions”Do I need to know CSS or HTML? No. The Builder is fully visual, and the live preview shows your changes instantly.
What languages does the captive portal support? The guest portal is localized in Portuguese, Spanish, and English, and detects the guest’s device language automatically.
Can I preview what guests see before going live? Yes. The live preview shows every stage, and the “test as a guest” simulator walks the full flow with test data and no charges.
Where do guests actually pay? Payment is configured on the Payment Methods screen, reached from the Builder’s Online payment row. See Receive Pix Payments.
Explore next: Create & Sell Online Plans · Receive Pix Payments · How Guests Connect & Pay · WiFi Monetization Onboarding
Ready to design your portal? Start your free MKController account or talk to our team on WhatsApp.