Port forwarding on Mikrotik is a fundamental networking technique enabling access to internal services from the internet. As one of the most popular routers, Mikrotik provides robust tools for configuring this essential functionality.
Why configure port forwarding on MikroTik router?
Before diving into the configuration, it’s essential to understand the purpose of port forwarding. This technique is commonly used for:
- Remote access to services: Enabling remote access to servers such as FTP, SSH, or DVRs.
- Website hosting: Directing traffic to an internal web server.
- Online gaming: Opening specific ports for online games that require a direct connection to other players.
In this article, we’ll guide you through the step-by-step process of configuring port forwarding on Mikrotik using Winbox, its intuitive graphical interface.
Scenario
Let’s configure a scenario where we have an internal web server with the IP address 192.168.0.120, using the standard port 80 (HTTP). To make this server accessible externally, we’ll create a NAT rule on Mikrotik that redirects connections from port 9795 on the external interface to port 80 on the internal server. This configuration allows internet traffic destined for port 9795 to be forwarded to the web server.
Setting up port forwarding on Mikrotik
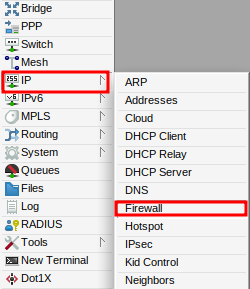
In the Winbox main menu, navigate to IP > Firewall.

Creating the NAT Rule
In the NAT tab, click the + button to add a new rule.

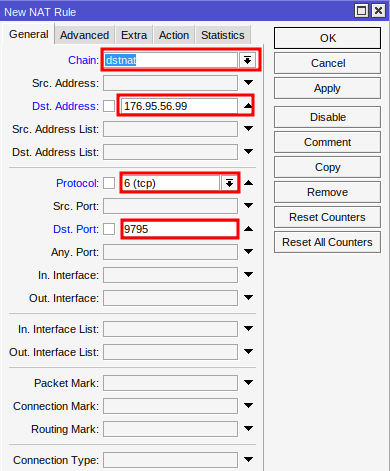
In the General tab, fill in the fields:
- Chains – select the “dstnat” option.
- Dst. Address – enter the public IP of the Mikrotik.
- Protocol – define the protocol (for this example, TCP was selected).
- Dst. Port – specify the external port to be redirected (for this example, it was 9795).

The “Dst. Address” field can be left blank when using DDNS. The important thing is to correctly configure the external interface of the Mikrotik (the one connected to the internet) in the “Out. Interface” field.
Define the Action
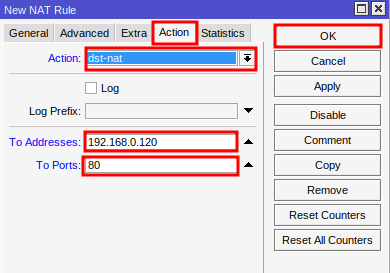
In the Action tab, fill in the fields:
- Action – select dst-nat.
- To Addresses – enter the IP of the internal server (example: 192.168.0.120).
- To Ports – enter the port of the internal service (example: 80).
- Click OK to save.

Test the Configuration
Access your public IP followed by the configured port (e.g. http://your_public_ip:9795) in a web browser. If the configuration is correct, you will be able to access the internal service.
Important Considerations
- Security: Opening ports exposes your network to potential attacks. Use firewalls and other security measures to protect your devices.
- Standard Ports: Avoid using standard ports for services, such as port 21 for FTP or port 80 for HTTP. Use non-standard ports to make attacks more difficult.
- Multiple Rules: You can create multiple forwarding rules for different services.
- Documentation: Keep a record of forwarding rules to facilitate network management.
Configuring port forwarding on Mikrotik using Winbox is a relatively simple task but requires attention to detail. By following this guide and considering the security tips, you can enable remote access to your services securely and efficiently.
Didn’t find the information you were looking for? Have other questions? Want to help us improve our materials? Don’t hesitate to contact us for MKController support!
Discover the ease of managing your Mikrotik network with MKController. Read our tutorial “Make Mikrotik Remote Access Easy: A Step-by-Step Guide with MKController” and try it out now.


