DHCP Server on Mikrotik: Step by Step Complete
DHCP Server on Mikrotik
DHCP Server, short for Dynamic Host Configuration Protocol Server, is a crucial service in IP networks that automates the assignment of IP addresses and other network configurations to connected devices. Think of it as an “address manager” that ensures each device on your network has a unique address and the necessary information to connect to the internet and other resources.
How it works:
- Request: A device without an IP address sends a DHCP request to the server.
- Assignment: The server checks the availability of IP addresses and selects one for the device.
- Response: The server sends a response to the device, containing the IP address, subnet mask, default gateway, and other settings.
- Configuration: The device automatically configures its network interface with the received information.
Benefits:
- Simplicity: Eliminates the need to manually configure each device.
- Efficiency: Ensures that each device has a unique and valid IP address.
- Scalability: Facilitates adding and removing devices on the network.
- Management: Allows centralized management of network configurations.
Use cases:
- Home networks: Facilitates the connection of various devices such as smartphones, tablets, notebooks, and smart TVs.
- Corporate networks: Simplifies the management of a large number of computers and printers.
- Public networks: Allows users to connect to the internet without configuring their devices.
Configuring the DHCP Server can be complex, varying depending on the router manufacturer or software used. This guide, specifically focused on Mikrotik, offers a detailed and simplified step-by-step guide, allowing you to configure the server successfully, even if you are a beginner.
Before configuring the DHCP Server on Mikrotik, it is necessary to add an IP to the interface that will provide the IP addresses. This detailed guide will walk you through the entire process, from configuring the IP to finalizing the DHCP Server.
Adding an IP to the interface
Access Mikrotik through Winbox.
Select IP > Addresses.
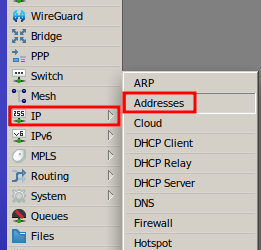
Click + to add a new address.
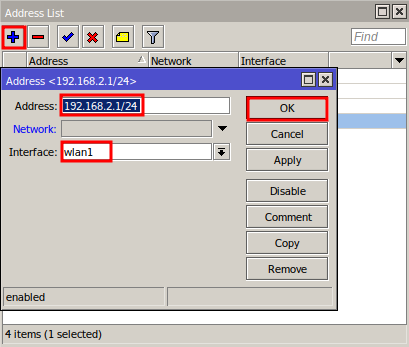
Fill in the fields:
- Address: Enter the IP address (e.g., 192.168.2.1/24).
- Network: If not using CIDR, enter the subnet mask (e.g., 255.255.255.0).
- Interface: Select the interface that will provide the IPs (e.g., wlan1).
Click OK to save.
Tip: Refer to our article “IP and Subnet Masks: A Journey Through the Foundations of Connectivity” to clarify any doubts about IP and subnet masks.
Configuring the DHCP Server on Mikrotik
Select IP > DHCP Server.
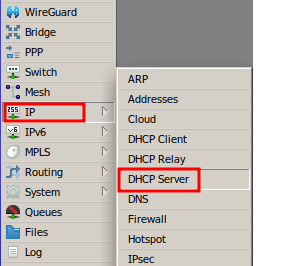
On the DHCP tab, click DHCP Setup.

Select the interface configured with the IP, then click the Next button.
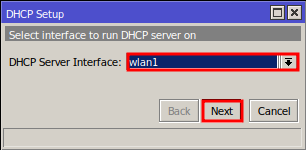
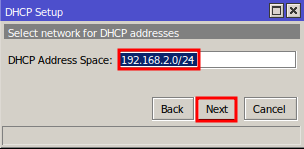
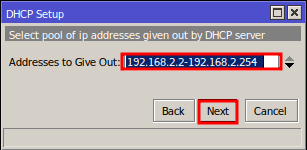
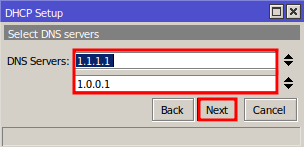
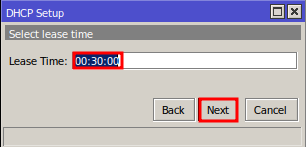
Keep moving forward by selecting the Next button on the next screens, confirming the settings:
IP network address.
Interface IP address as Gateway.

IP pool to be distributed.
DNS servers (e.g., 1.1.1.1 and 1.0.0.1).
IP lease time (can be changed).
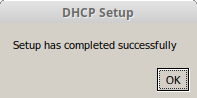
Click OK to finish.
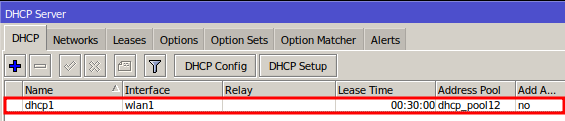
On the DHCP tab, the configured DHCP Server will be listed.
On the Leases tab, you can monitor the devices connected to the network and their IPs.

With this guide, you will successfully configure the DHCP Server on Mikrotik. Now, your devices on the network will automatically receive IP addresses, facilitating access and connectivity.
You can see the content of this article in the video below, if you prefer!