
MikroTik NTP
What is NTP?
NTP, or Network Time Protocol, is a fundamental protocol for synchronizing clocks across computer networks. It ensures that all devices connected to the network, such as servers, workstations, routers, and other equipment, maintain the same accurate date and time, preventing discrepancies that can compromise the operation of various services and applications.
Benefits of NTP:
- Precision and reliability: NTP ensures that all devices on the network maintain the same accurate date and time, minimizing errors and malfunctions.
- Enhanced security: Accurate time synchronization is crucial for network security, as it enables the correct application of firewall rules, authentication, and other protection mechanisms.
- Improved network management: NTP facilitates the management of logs, reports, backups, and other tasks that depend on precise date and time.
- Optimized performance: With synchronized time, network services and applications function more efficiently and reliably, preventing problems and optimizing productivity.
NTP is an essential component for any computer network that requires precision, reliability, and security. By configuring NTP correctly, you ensure that your network runs like clockwork, preventing disruptions and optimizing overall performance.
This guide provides a detailed step-by-step process for configuring NTP (Network Time Protocol) on your MikroTik router, ensuring that it is always synchronized with the official time.
Configure NTP on Your MikroTik in Minutes
Set the correct time zone
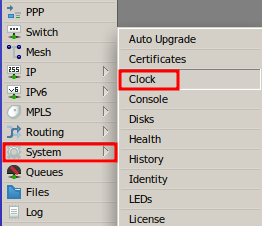
Go to System > Clock.
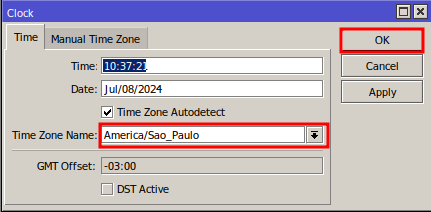
Select the correct time zone (e.g., America/Sao_Paulo for Brazil) from the “Time Zone Name” dropdown menu.
Click “OK” to save the changes.
Configure the MikroTik NTP Client
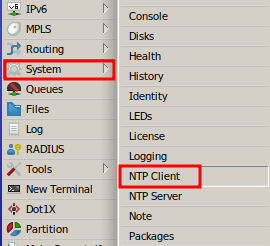
In the left-hand side panel, click on “System” and then on “NTP Client.”
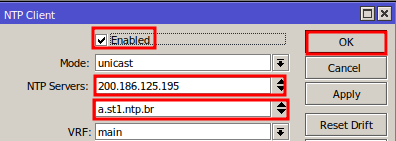
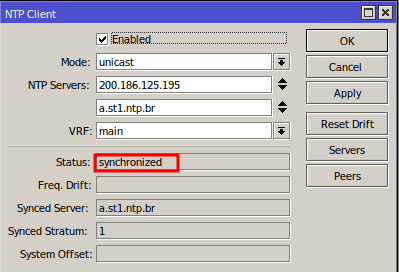
Check the “Enable” box to activate the NTP client.
In the “NTP Servers” field, enter the IP addresses or hostnames of the NTP servers you want to use. For this example, you can use the following addresses: “200.186.125.195” and “a.st1.ntp.br.” If you are not in Brazil, search for public NTP servers for your region, such as on the website “https://www.ntppool.org/en/use.html“.
Click “OK” to apply the settings.
With NTP, your MikroTik network will always be up-to-date and functioning flawlessly.
Additional Tips:
- It is recommended to use at least two NTP servers for redundancy and accuracy.
- You can monitor the status of NTP in the MikroTik logs.
- If you are using a local NTP server, make sure it is configured and synchronized correctly.
Did you not find the information you were looking for? Do you have other questions? Do you want to help us improve the material? Do not hesitate to contact us and seek support from MKController! Click here for any questions.
If you have Mikrotiks in your network, enhance the control, efficiency, and remote access of your Mikrotik with MKController. Click here to try it now and discover the power of advanced and intuitive management to elevate your experience to new heights!
