NAT on Mikrotik: How to configure NAT to access the internet
NAT (Network Address Translation) is a networking technique that allows devices on a private network (LAN) to access the internet using a single public IP address. This is done by changing the source IP address of data packets sent by the LAN to the public IP address of the NAT on Mikrotik.
In Mikrotik, NAT is implemented in the IP > Firewall menu. To configure NAT, you need to create a NAT rule. NAT rules consist of three main fields:
- Chain: Indicates the direction of traffic that the rule will apply. Available options are srcnat (source traffic) and dstnat (destination traffic).
- Out. Interface: Indicates the outbound interface that will be used to send the data packets.
- Action: Indicates the action that will be performed by the rule. Available options are masquerade (for link NAT with dynamic IP) and src-nat (for link NAT with valid IP).
Definitions:
Masquerade and src-nat are the two options available for the Action action in a NAT rule on Mikrotik.
Masquerade is a simple form of NAT that is used when the internet link of the NAT device has a dynamic IP. In this case, the source IP address of data packets sent by the LAN is changed to the public IP address of the NAT device. The NAT device does not need to maintain a record of NAT mappings, as the public IP address of the NAT device can change at any time.
Src-nat is a more complex form of NAT that is used when the internet link of the NAT device has a valid IP. In this case, the source IP address of data packets sent by the LAN is changed to a specific IP address, which is specified in the NAT rule. The NAT device needs to maintain a record of NAT mappings, as the source IP address of data packets sent by the LAN may be different from the IP address specified in the NAT rule.
Here is a table that summarizes the main differences between masquerade and src-nat:
| Feature | Masquerade | Src-nat |
|---|---|---|
| Internet link | Dynamic | Valid |
| NAT mappings record | No | Yes |
| Source IP address of data packets | Changed to the public IP address of the NAT device | Changed to a specific IP address |
The masquerade option is simpler and more efficient than the src-nat option. However, the src-nat option offers more control over NAT.
NAT mappings record
A NAT mappings record is a table that stores information about IP address conversions performed by NAT. This information includes the source IP address, destination IP address, source port, and destination port.
NAT mappings records can be used for monitoring and auditing purposes. They can be used to track network traffic and identify potential problems.
Configuring NAT on Mikrotik
To configure NAT on Mikrotik, follow the steps below:
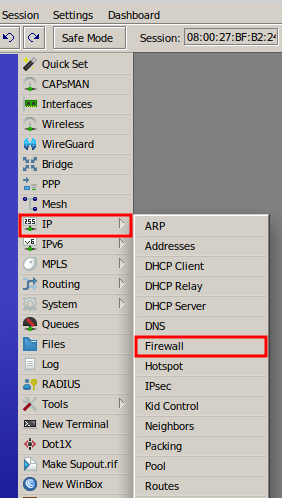
Access the RB Mikrotik through Winbox and open the IP > Firewall menu.
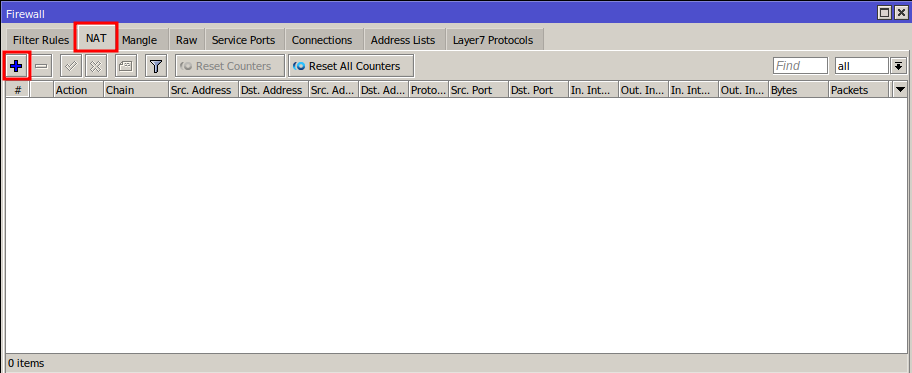
In the open window, select the NAT tab and click the add button (represented by the blue plus symbol).
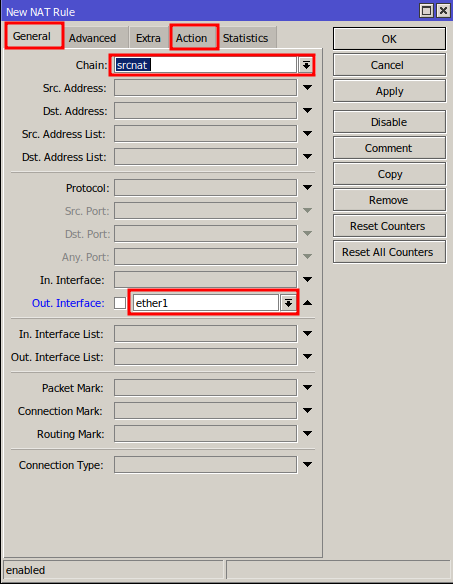
Configuring the NAT rule in Mikrotik
In the New NAT Rule window, configure the following fields:
- Chain: Select srcnat.
- Out. Interface: Select the outbound interface for the internet (where the link arrives), in this scenario it was defined as “ether1”.
Now click on the “Action” tab.
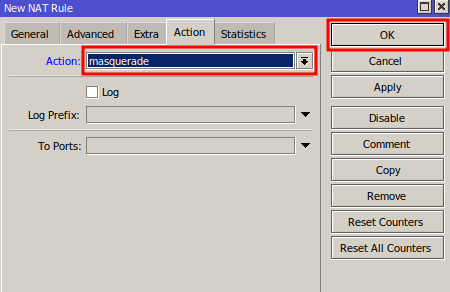
NAT for link with dynamic IP
If the internet link of your RB Mikrotik has a dynamic IP, configure the Action field as masquerade, then click the OK button.
NAT for link with valid IP
If the internet link of your RB Mikrotik has a valid IP, configure the following fields:
- Action: Select src-nat.
- To Address: Enter the valid IP fixed on the Mikrotik interface that receives the link.
After clicking the OK button.

After configuring the NAT rule, devices connected to your RB Mikrotik will be able to access the internet.
Did you not find the information you were looking for? Do you have other questions? Do you want to help us improve the material? Do not hesitate to contact us and seek support from MKController! Click here for any questions.
If you have Mikrotiks in your network, enhance the control, efficiency, and remote access of your Mikrotik with MKController. Click here to try it now and discover the power of advanced and intuitive management to elevate your experience to new heights!
You can see the content of this article in the video below if you prefer!