IP Address Pools in Mikrotik: Guide to Optimize Your Network
An “IP Address Pools in Mikrotik” is like a stock of identification numbers that devices use to connect to the internet. Imagine being able to manage these numbers efficiently, avoiding conflicts and optimizing the use of your network resources! This complete guide will take you from the basics to the step-by-step creation of IP Address Pools in Mikrotik, transforming you into a network administration master.
Benefits of IP Address Pools:
- Efficient Management: Say goodbye to manual IP configuration! With pools, you automate the dynamic allocation of addresses, simplifying the life of the administrator.
- Avoids IP Conflicts: Forget about the problems of devices with the same IP. Pools ensure that each device has its unique identity on the network, without conflicts or interruptions.
- Flexibility for Growth: Is your network growing? No problem! Pools allow you to add or remove devices easily, adapting to your needs.
- Ideal for Various Scenarios: Corporate networks, internet service providers (ISPs) and any environment that seeks optimization and flexibility in IP management.
Creating an IP Pool Step by Step:
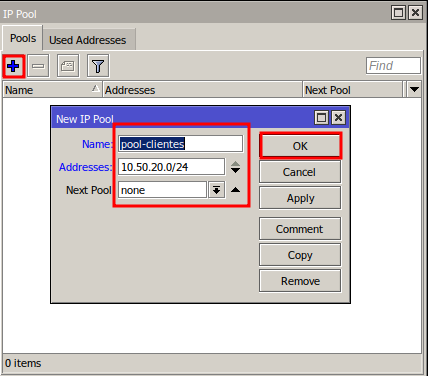
Accessing Mikrotik: Open Winbox, connect to your router and navigate to “IP” > “Pool”.

Configuring the Pool: Click on “Add” (+), enter a descriptive name and define the range of IPs to be used (ex: 10.50.20.0/24).
Saving and Viewing: Click on “OK” to save the created pool.
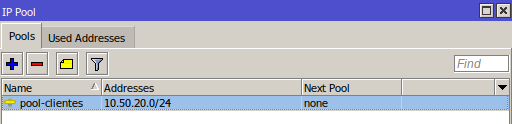
You can see the list of pools on the same screen.
With this complete and step-by-step guide, you are ready to master the art of IP Pool management on Mikrotik! Implement this powerful practice in your network and enjoy optimization, flexibility and simplicity in administration.
Did you not find the information you were looking for? Do you have other questions? Do you want to help us improve the material? Do not hesitate to contact us and seek support from MKController! Click here for any questions.
If you have Mikrotiks in your network, enhance the control, efficiency, and remote access of your Mikrotik with MKController. Click here to try it now and discover the power of advanced and intuitive management to elevate your experience to new heights!