Static Routing on Mikrotik
Master static routing on Mikrotik and become a network guru!
This comprehensive and detailed guide will walk you through the step-by-step process of configuring static routing on Mikrotik, using a practical and straightforward example. Learn how to connect different networks with efficiency, security, and simplicity!
What is Static Routing and Why is it Important?
Static routing is a manual method of directing network traffic between different IP networks. Unlike dynamic routing, which uses automatic protocols, static routing requires the manual configuration of each route in the device’s routing table.
Advantages of Static Routing on Mikrotik:
- Simplicity: Easy to configure and manage, especially in small networks.
- Reliability: Static routes are always the same, ensuring a predictable path for traffic.
- Security: Allows you to control traffic flow and restrict access to specific networks.
- Efficiency: Can be more efficient in stable networks with well-defined topologies.
Disadvantages of Static Routing on Mikrotik:
- Lack of Adaptability: Does not adapt to changes in network topology, requiring manual configuration.
- Limited Scalability: Difficult to manage in large and complex networks with frequent changes.
- Manual Administration: Requires manual intervention to add, remove, or modify routes.
- Potential for Errors: Manual configuration increases the risk of errors that can lead to connectivity issues.
Applications of Static Routing on Mikrotik:
- Small and Stable Networks: Ideal for homes, offices, or local networks with defined topologies.
- Network Segmentation: Allows you to separate networks and control traffic flow between them.
- Connections to External Networks: Useful for establishing connections to external networks like ISPs or VPNs.
- Backup Routing: Can be used as backup routing in conjunction with dynamic routing.
Learn to Configure Static Routing on Mikrotik
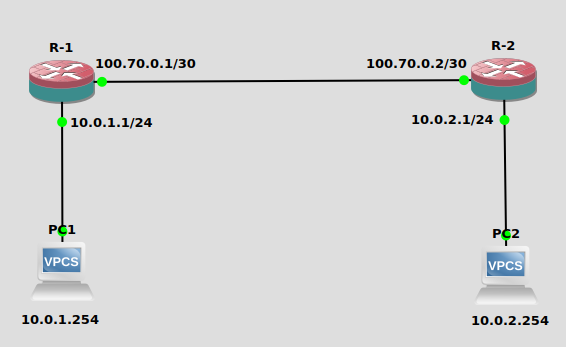
Objective: Allow PC 1 in the 10.0.1.0/24 network on Router R-1 to communicate with PC 2 in the 10.0.2.0/24 network on Router R-2.
Configuring Router R-1
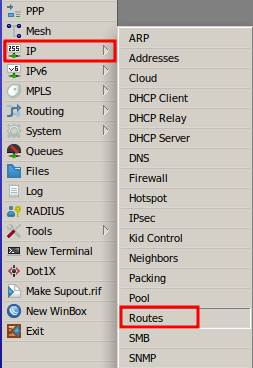
Access the IP menu and select the Routes option.
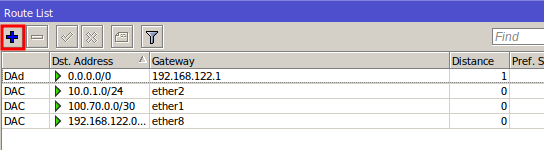
In the Route List window, click the + button to add a new route.
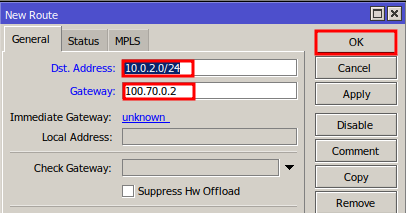
In the New Route window, complete the fields as follows:
- Destination Address: Enter the destination network address (e.g., 10.0.2.0/24).
- Gateway: Enter the IP of the next hop (e.g., 100.70.0.2).
Click OK to save the configuration.
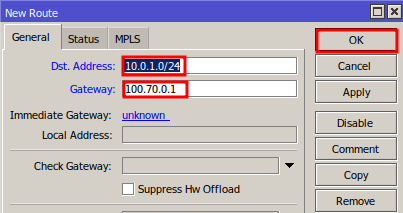
Configuring Router R-2
Access Router R-2 through Winbox and navigate to the New Route screen.
Complete the fields as follows:
- Destination Address: Enter the destination network address (e.g., 10.0.1.0/24).
- Gateway: Enter the IP of the next hop (e.g., 100.70.0.21).
Click OK to save the configuration.
Testing Connectivity:
On your computer, open the command prompt (Windows) or terminal (Linux/macOS).
Execute the ping command, followed by the IP address of a device on the other network. For example, ping 10.0.2.254 to check if PC 1 can communicate with PC 2.
If the ping is successful, you will see replies with the response time. If the ping fails, verify that the router configurations are correct.
By following this step-by-step guide, you will be ready to configure static routing on Mikrotik and ensure efficient communication between the networks in your scenario. Static routing offers simplicity, reliability, and security, making it a valuable tool for various network environments.
Did you not find the information you were looking for? Do you have other questions? Do you want to help us improve the material? Do not hesitate to contact us and seek support from MKController! Click here for any questions.
If you have Mikrotiks in your network, enhance the control, efficiency, and remote access of your Mikrotik with MKController. Click here to try it now and discover the power of advanced and intuitive management to elevate your experience to new heights!