PPPoE Server on Mikrotik: Step-by-Step Configuration Guide
PPPoE, or Point-to-Point Protocol over Ethernet, is a network protocol that allows two hosts to establish a point-to-point connection over an Ethernet network. A PPPoE server on Mikrotik is often used by Internet service providers (ISPs) to provide Internet access to their customers.
PPPoE works by encapsulating PPP frames inside Ethernet frames. PPP frames are used to carry data and control information between the hosts. Ethernet frames are used to carry the PPP frames over the Ethernet network.
The PPPoE service on Mikrotik allows you to configure a PPPoE server to provide Internet access to your customers. To configure a PPPoE server on Mikrotik, we will see in this article the following steps:
- How to create an IP address pool on Mikrotik.
- How to create a PPPoE profile on Mikrotik.
- How to create a PPPoE server on Mikrotik.
- How to create a PPPoE user on Mikrotik.
How to create an IP address pool on Mikrotik
For more efficient management of IP addresses in a centralized way, it is recommended to create an IP address pool on Mikrotik. A pool consists of a collection of IP addresses that can be assigned to devices on a network, simplifying IP management and ensuring that each device has a unique identifier on the network.
Steps to Create an IP Address Pool on Mikrotik
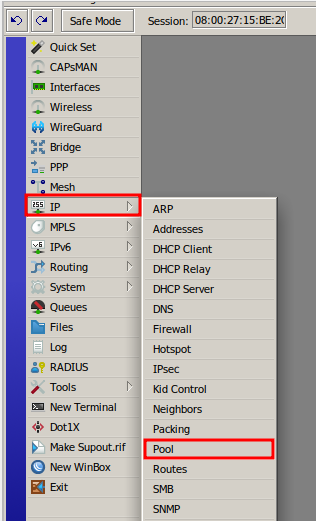
Access Mikrotik through Winbox and select the “IP” menu.
Select the “Pool” option.
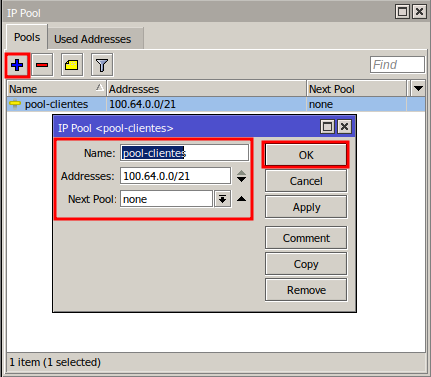
In the “IP Pool” window that opens, click “Add” (+) and fill in the following fields:
- Name – give a distinctive name to the pool to facilitate management.
- Addresses – define the range of IPs to be distributed to customers. For example, use the range “100.64.0.0/21”, following the IANA standard for GCNAT blocks (RFC 6598), which in this example provides 2048 IPs.
Then click “OK” to save the settings.
Configuração de um Perfil PPPoE no MikroTik
Um perfil PPPoE (PPPoE Profiles) é um conjunto de configurações que determinam a configuração de uma conexão PPPoE, sendo utilizado para gerenciar o acesso à Internet de usuários ou dispositivos.
PPPoE Profile Configuration on MikroTik
A PPPoE profile (PPPoE Profiles) is a set of settings that determine the configuration of a PPPoE connection, being used to manage user or device access to the Internet.
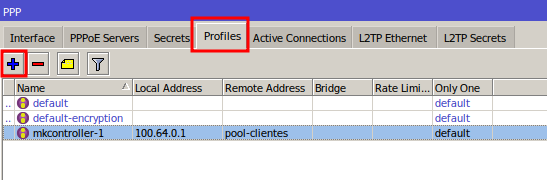
Steps to create a PPPoE profile on Mikrotik
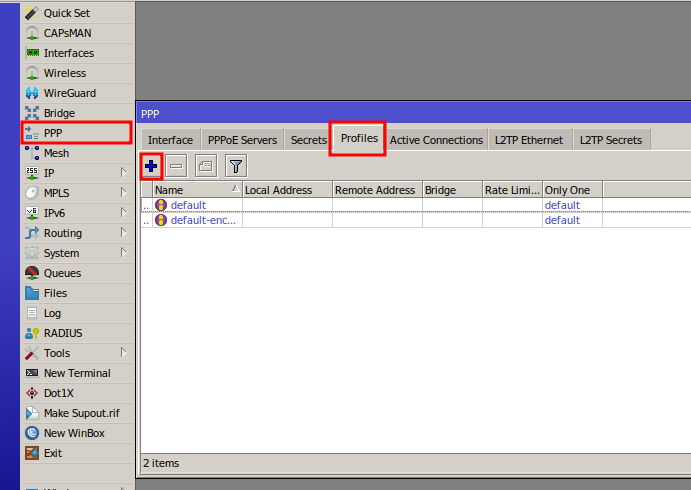
Access the “PPP” menu, and in the “Profile” tab, click “Add” (+).
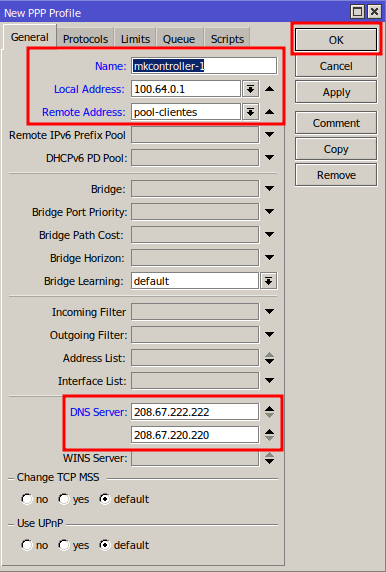
In the “New PPP Profile” window, fill in the fields:
- Name – name of the PPPoE profile (for example, “mkcontroller-1”).
- Local Address – local IP address of the server (for example, 100.64.0.1).
- Remote Address – select the IP pool created previously.
- DNS Server – enter the IP addresses of the desired DNS servers.
Click “OK”.
PPPoE Profile Configuration for Connection Plan
In the “Profile” tab, click “Add” (+).
In the “General” tab, in the “Name” field, enter the name of the connection plan (for example, “100Mbps”).
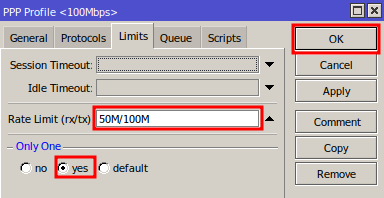
After, select the “Limits” tab.
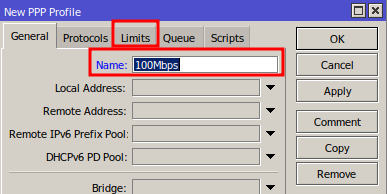
Define the bandwidth limit in the “Rate Limit (rx/tx)” field (ex: 50M/100M).
Mark “Only One” to restrict one active connection per PPPoE user.
Click “OK”.
Configuring the PPPoE Server on MikroTik
Steps to configure a PPPoE server on Mikrotik
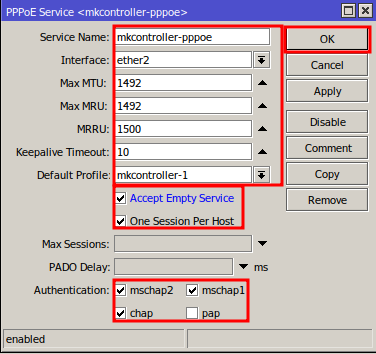
Select the “PPPoE Servers” tab and click “Add” (+).
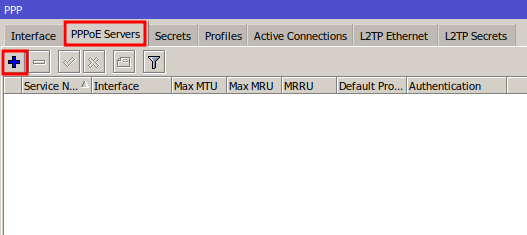
In the “PPPoE Service” window, fill in the fields as follows:
- Service Name – name of the PPPoE server.
- Interface – choose the appropriate Ethernet interface.
- Max MTU e Max MRU – keep at 1492.
- MRRU – set to “1500”.
- Keepalive timeout – recommended to keep at “10” seconds.
- Default Profile – select the profile configured previously.
- Accept Empty Service – enable this option to allow PPPoE clients to connect even without a server authentication service.
- One Session Per Host – enable this option to ensure that only one PPPoE client with the same MAC address can connect to the PPPoE server.
- Authentication – for greater security, disable the “pap” option and keep the remaining authentication options enabled.
Click “OK”.
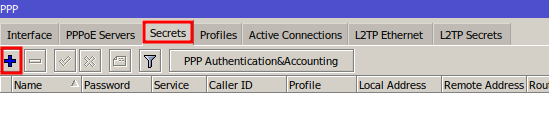
Configuring a PPPoE User on Mikrotik
The PPPoE Secrets on Mikrotik is a powerful tool that can be used to configure users and PPPoE connections.
Steps to configure a user on Mikrotik PPPoE Secrets
Select the “Secrets” tab and click “Add” (+).
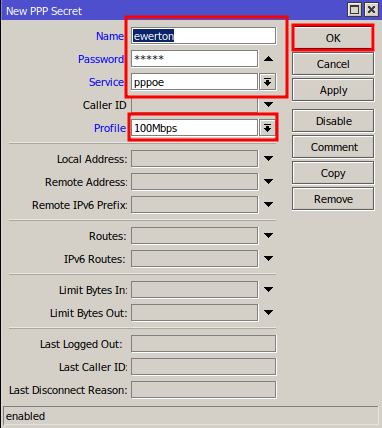
In the “New PPP Secret” window, fill in the fields:
- Name – user name (for example, “ewerton”).
- Password – connection password.
- Service – select “pppoe”.
- Profile – select the profile created for the connection plan.
Click “OK”.
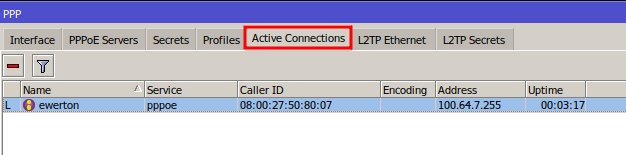
Active PPPoE Connections
In the “Active Connections” tab, you can monitor the users connected to the PPPoE server.
By following these steps, you will be building a solid foundation for efficient management of the PPPoE server features, enabling accurate and effective monitoring.
If you need to connect to the internet using a PPPoE Client, the article “How to configure PPPoE Client on Mikrotik” is a must-read. It provides all the information you need to set up your connection successfully.
Didn’t find the information you were looking for? Have other questions? Want to help us improve our materials? Don’t hesitate to contact us for MKController support!
Discover the ease of managing your Mikrotik network with MKController. Read our tutorial “Make Mikrotik Remote Access Easy: A Step-by-Step Guide with MKController” and try it out now.
Check out the video below if you’d rather watch the content of this article!