Configuring VLANs (Virtual Local Area Networks) on Mikrotik devices is essential for organizing and optimizing networks. This article explains how to configure VLANs on Mikrotik, covering the main concepts, practical steps, and tips to avoid common problems. If you want to improve the security and performance of your network, keep reading.
What are VLANs and why use them?
VLANs allow you to segment a physical network into multiple logical networks, increasing security and reducing unnecessary traffic. On Mikrotik, VLANs can be configured to efficiently manage different types of devices or departments within an organization.
Benefits of VLANs on Mikrotik
- Enhanced security – Traffic isolation between different groups.
- Reduced congestion – Lower volume of data traveling between unrelated devices.
- Flexibility – Easy network expansion and management.
How to configure VLANs on Mikrotik?
Configuring VLANs on Mikrotik may seem challenging, but the process becomes simpler by following a clear step-by-step guide. Check out the steps below:
Access the Mikrotik device
Make sure you are connected to the Mikrotik device via WinBox, terminal, or web interface.
Create the VLAN interface
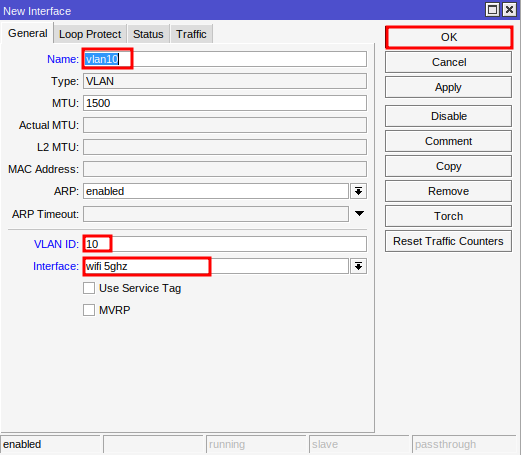
In WinBox, go to the Interfaces tab.
Select the “VLAN” tab.
Click “+”.

Configure the following parameters:
- Name – Descriptive name for the VLAN (e.g., VLAN10).
- VLAN ID – The unique identifier of the VLAN (e.g., 10).
- Interface – The associated physical interface (e.g., wifi 5ghz).
Click “OK”.

Add the IP configurations
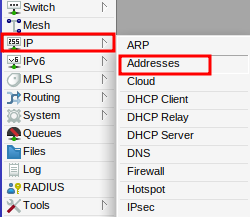
Navigate to IP > Addresses.

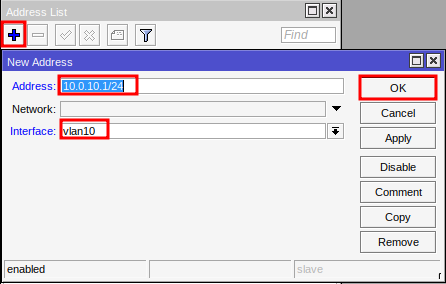
Click “+”.
Configure the following parameters:
- Address: Add an IP address for the created VLAN (e.g., 10.0.10.1/24).
- Interface: Select the created VLAN interface (e.g., vlan10).

Configure the DHCP Server (optional)
For more detailed information about bridge configurations on Mikrotik, see our article “Configuring DHCP Server on Mikrotik: A Complete Beginner’s Guide (Detailed Step-by-Step)”. Below, we will show a summary of the necessary steps.
If you want devices connected to the VLAN to automatically obtain IP addresses:
- Go to IP > DHCP Server.
- Click “Setup” and select the VLAN interface.
- Follow the wizard to configure the DHCP server.
Test the configuration
Make sure that the devices connected to the VLAN are obtaining IP addresses.
Tips and best practices for configuring VLANs on Mikrotik
- Planning is essential: Before configuring, determine which VLANs are needed and define the IP address ranges.
- Name the interfaces clearly: Use descriptive names for easier management.
- Document the configurations: Keeping a record of the VLANs and their configurations helps with troubleshooting.
Configuring VLANs on Mikrotik is an indispensable skill for network administrators. With correct use, it is possible to significantly improve the organization, security, and efficiency of any network. Follow this guide to start your configuration, and do not hesitate to adapt the tips to your specific needs.
Didn’t find the information you were looking for? Have other questions? Want to help us improve our materials? Don’t hesitate to contact us for MKController support!
Discover the ease of managing your Mikrotik network with MKController. Read our tutorial “Make Mikrotik Remote Access Easy: A Step-by-Step Guide with MKController” and try it out now.


