MikroTik Bridge: Step-by-Step Tutorial
What is a MikroTik Bridge?
A MikroTik bridge acts as a bridge between two or more network interfaces. Imagine you have two highways that don’t connect directly. A bridge would be like building a bridge to connect these two highways, allowing traffic to flow freely between them.
How does it work in practice?
When you create a bridge in MikroTik, you are grouping two or more network interfaces. The traffic that arrives on one of these interfaces is replicated to all other interfaces in the bridge, allowing devices connected to these interfaces to communicate with each other.
Example:
Imagine you have a MikroTik with two interfaces: Ethernet1 and Ethernet2. You create a bridge called “my_bridge” and add these two interfaces to the bridge. Now, any device connected to Ethernet1 can communicate with any device connected to Ethernet2, as if they were all connected to the same switch.
What is it used for?
- Creating segmented networks: By creating VLANs, you can isolate different departments or types of traffic within your network, increasing security and performance.
- Connecting different networks: A bridge allows you to connect networks with different technologies, such as Ethernet and Wi-Fi.
- Load balancing: By distributing traffic across multiple interfaces, you can improve your network performance and avoid bottlenecks.
- Creating redundant networks: A bridge can be used to create redundant networks, increasing your network availability.
How to configure a Bridge in MikroTik
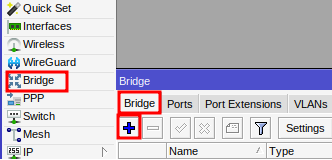
Connect to your MikroTik using Winbox.
Select the “Bridge” menu, and then click “+”.
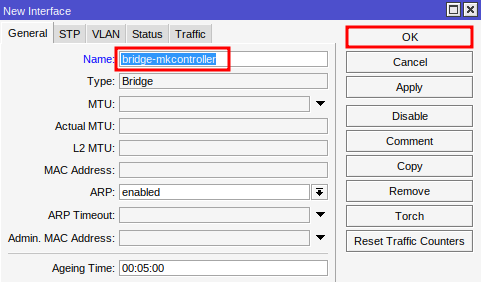
Create the bridge
Enter a name for the bridge (e.g., bridge-mkcontroller).
Click OK.
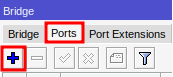
Add interfaces
In the Ports tab, click the “+” button.
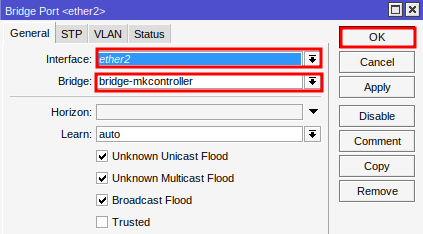
Enter the fields:
- Interface – add the interface you want to connect to the bridge.
- Bridge – select the bridge created previously.
Click OK.
Want to simplify your network configuration? Configure a DHCP server on your bridge and allow your devices to obtain IP addresses automatically. See our complete guide “Configuring the DHCP Server on MikroTik: A Complete Guide for Beginners (Step by Step Detailed)” for more information.
Did you not find the information you were looking for? Do you have other questions? Do you want to help us improve the material? Do not hesitate to contact us and seek support from MKController! Click here for any questions.
If you have Mikrotiks in your network, enhance the control, efficiency, and remote access of your Mikrotik with MKController. Click here to try it now and discover the power of advanced and intuitive management to elevate your experience to new heights!