Mikrotik Kid Control – control access on your network - MKController
Mikrotik Kid Control allows parents to have control over the way children and teenagers use the network and also enables its application in the corporate environment.
Introduction
Internet access is not a reality just for adults. Nowadays, children and teenagers are connecting to the Internet earlier and earlier. Despite contributing to the development of this audience, the virtual environment can offer risks, inappropriate content and many other problems. For this reason, parents often look for tools that allow them to control their children’s Internet activities and access. This function allows you to control and block internet access.
Having security to access the internet is everyone’s concern and we’ve already addressed this subject here. Check out the text on OpenDNS in the MKController Knowledge Center for blocking unwanted sites and see important tips for your day to day life.
Changing the password or turning off the Wi-Fi are not the best options when you want to limit the access of children and teenagers to the Internet. Mikrotik implemented the Kid Control tool, starting from the RouterOS 6.42 version, offering mechanisms for controlling access time, limiting internet bandwidth consumption of devices connected to the network and others. That is allows the control and blocking of access to the internet, because administrators can implement system settings that control access to the internet through the router. Thus, users can define the necessary parameters to provide or even deny access to the Internet in certain periods.
Despite the name referring to the idea of controlling children’s activities on the network, allows controlling and blocking internet access also in the corporate environment. Companies can use the tool to limit access to their employees’ devices. This ensures that users only have access to the Internet during stipulated periods.
In this article, we will present step by step and examples to configure the rules of limitations of Mikrotik Kid Control for the control and blocking of access to the Internet.
Synchronizing Mikrotik clock
NTP Server
The first step is to synchronize the clock of the Mikrotik device so that the blocks and limitations of internet bandwidth consumption are made at the correct time. Subsequently, settings will be made on the Kid Control device, ensuring that the stipulated times are adequate. For this example, we will synchronize with the ntp.br servers. If you are in another country, it is necessary to use the ips of the local ntp server.
The steps to sync the watch are
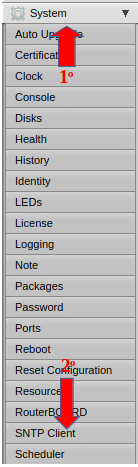
1 – In the Webfig, click on System (1st indication);
2 – Click on SNTP Client (2nd indication).
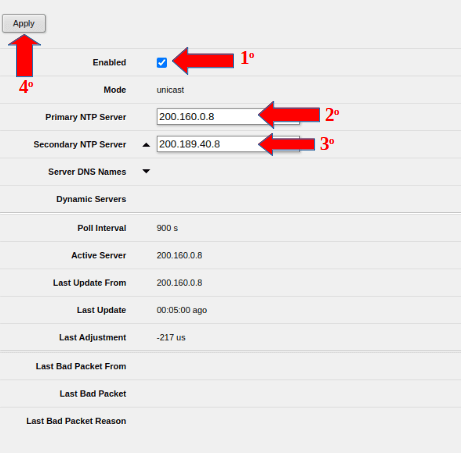
3 – Check the Enable option (1st indication);
4 – In the “Primary NTP Server” field, we will inform the first ip “200.160.0.8” (2nd indication),
5 – In the “Secondary NTP Server” field, we will inform the second ip “200.189.40.8” (3rd indication);
Remember, if you are in another country, it is necessary to inform the IPs of the local ntp server.
6 – Click on the “Apply” button (4th indication), as shown below.
To finish the clock synchronization step:
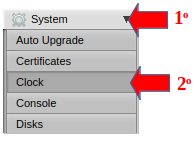
1 – Click on “System” (1st indication);
2 – Click on the “Clock” option (2nd indication).
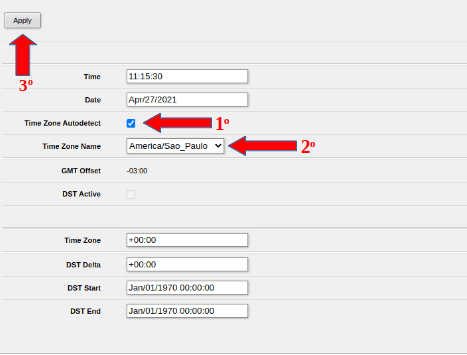
3 – Select the option “Time Zone Autodetect” (1st indication),
4 – In the “Time Zone Name” field (2nd indication), for this example we select “America/Sao_Paulo – if you are in another country, select local Time Zone,
5 – Click on the “Apply” button (3rd indication), as shown on the side.
To set up Mikrotik Kid Control
Once the clock has been synchronized, we will start the settings in Kid Control:
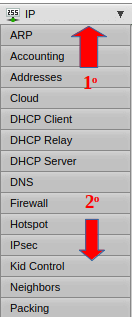
1 – In the side menu of the Webfig, click on IP (1st indication),
2 – Click on the Kid Control option (2nd indication).
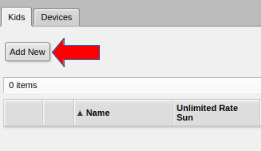
3 – To create a rule, click on the “Add New” button.
Limit bandwidth consumption in Kid Control
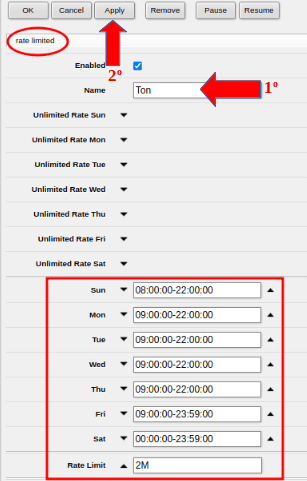
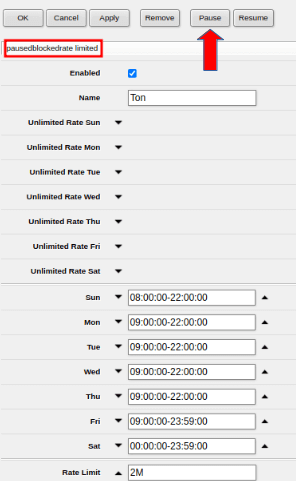
The indication of the times with the limitation of internet bandwidth consumption will be carried out in the field highlighted in red in the following figure.
For this example, we set the settings below;
1 – Name field (1st indication): Ton;
2- The times for limiting internet consumption will be: Sunday from 8 am to 10 pm / Monday to Thursday from 9 am to 10 pm / Friday from 9 am to 11:59 pm / Saturday from 12 am to 11:59 pm;
3 – In the “Rate Limit” field, we define “2M” as a limitation, representing 2Mbps of download/upload;
4 – Click on the “Apply” button (2nd indication);
If the message “rate limited” appears, as highlighted, circled in red in the image, it means that the limitation has been configured.
5 – Click on the “OK” button to finish the configuration.
Identify devices for access control for Kid Control
We must inform which device will enter the Kid Control rule, following these steps:
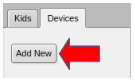
1 – To identify the device, click on the “Devices” tab (1st indication);
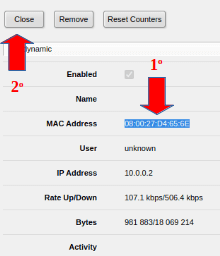
2 – Double click on the line with the identification of the device for applying the rule, which can be by MAC or IP (in this example it was identified by the IP Address – 2nd indication), as shown in the figure below.

3 – Copy the MAC address of the device (1st indication);
4 – Click on the “Close” button (2nd indication), as shown on the side.
5 – Back to the “Devices” tab, click on “Add New”.
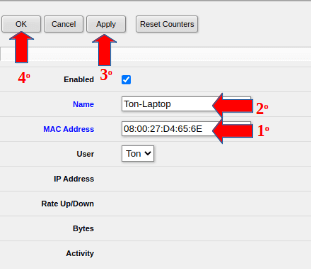
6 – Enter the MAC address of the device (1st indication) – seen in step 3.
7 – Enter the name to identify the device (2nd indication).
8 – Click on the “Apply” buttons (3rd indication) and then on “OK” (4th indication).
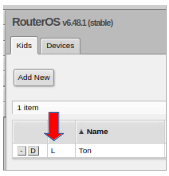
In the Kids tab, we can see the letter “L” indicating that the device has limited bandwidth consumption.
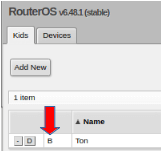
In this other example, shown on the side, the letter “B” indicates that the device was blocked because it was outside the hours configured in the Kid Control rule.
Kid Control’s Pause Option
An interesting option in Kid Control is to block the device, even if it is in the time allowed by the rule, using the “Pause” option. To block device access with this feature, just follow the steps below:
1 – Go back to Kid Control;
2 – On the Kids tab, click on the configured profile;
3 – Click on the “Pause” button, and the message in the field highlighted in red “pausedblockedrate limited” will appear;
4 – To confirm, click on the “OK” button;
5 – If you want to go back only with the limitation of internet bandwidth, removing the Pause (blocking) of the device, click on the “Resume” button and then on “OK”.
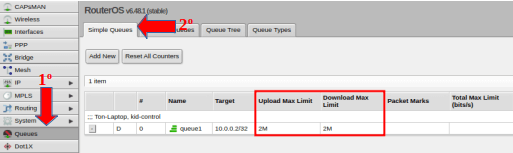
Queues
To check where Kid Control creates the limitation, click on the options:
1 – “Queues” (1st indication);
2 – Within “Simple Queues” (2nd indication), it is possible to view the rule that was created for limiting the device, highlighting the Download and Upload rate of 2 Mbps.
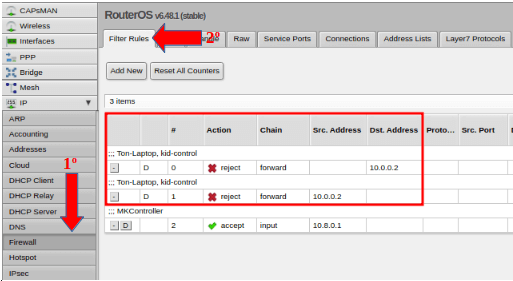
Checking firewall rules
1 – Access the Firewall option (1st indication);
2 – In the “Filter Rules” tab (2nd indication), we see the rules that Kid Control created in the Firewall to block the device when the profile is on Pause or outside the allowed time.
After performing this configuration process, users (children or employees) will have their access to the Internet and their devices limited, according to the rules defined in the process, guaranteeing security and peace of mind. You can change the rules, if necessary, by following the steps already detailed here.
Didn’t find the information you were looking for? Do you have other questions? Do you want to help us improve the material? Do not hesitate to contact and send help from MKController! Click here for any question. If you have not adopted your Mikrotik device in MKController, simply click here to follow the documentation.