Mikrotik Hotspot Voucher: The ideal solution for your Wi-Fi network.
Tired of wasting time with complex Hotspot configurations? Say goodbye to frustration and set up a Mikrotik Hotspot Voucher in minutes with the MKController Android app! This detailed step-by-step guide will walk you through every step, from checking the initial configuration to confirming the successful connection of your Mikrotik device.
What is a Mikrotik Hotspot Voucher?
A Mikrotik Hotspot Voucher, also known as a Wi-Fi access point, is your gateway to a world of wireless connectivity. It allows multiple devices, such as smartphones, tablets, and laptops, to connect to the internet quickly and easily.
Why use MKController to set up your Mikrotik Hotspot?
MKController makes setting up your Mikrotik Hotspot a simple and intuitive experience, even for beginners. With just a few clicks, you’ll be ready to share your Wi-Fi connection with the world!
What you need to get started:
- A Mikrotik router configured in MKController. If you haven’t already configured your router, follow the instructions in our article “Adopting a Mikrotik at your MKController“.
- The MKController app installed on your Android device.
Step-by-Step Guide to Setting Up Your Mikrotik Hotspot
Open the MKController app on your Android device.
In the main menu, tap “Captive”.
Select the site where the Mikrotik device was created, and then choose the Mikrotik you want to configure.
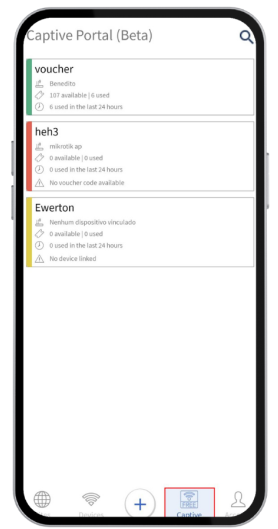
Then, choose the site where the Mikrotik device was created.
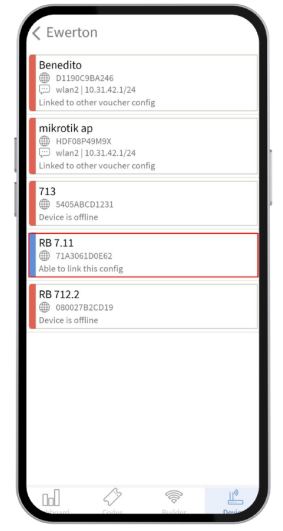
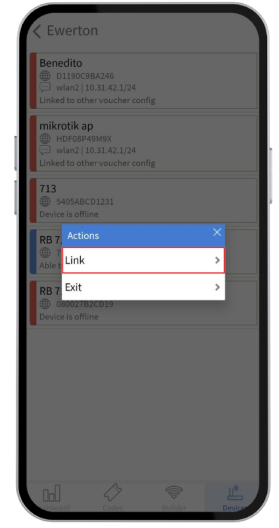
Tap the “Link” option to start the configuration process.
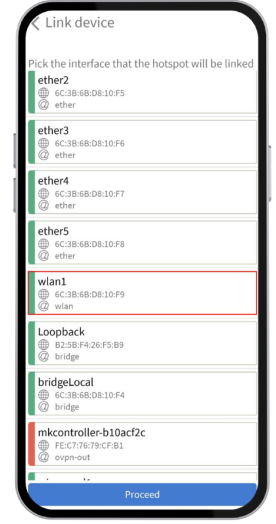
Select the Hotspot interface
Choose the Wi-Fi interface that will be used for your Hotspot.
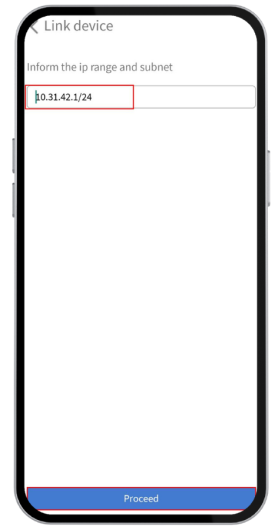
Enter the IP address range that will be available to users of your Hotspot network.
Click “Proceed”.
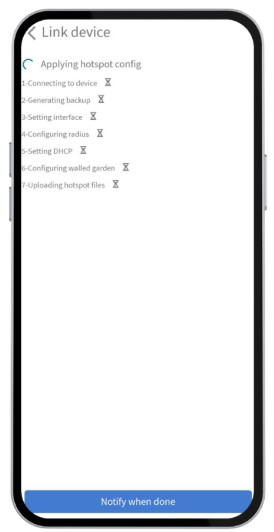
Wait for the configuration process to complete.
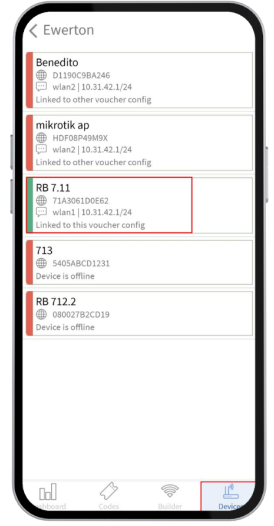
Verify successful connection
Once you have completed the steps above, you can check if the Mikrotik device has been successfully linked for the Hotspot. To do this, simply go back to the “Devices” screen in the MKController app and observe the status of the device.
Congratulations! You have successfully configured your Mikrotik Hotspot and are ready to share your Wi-Fi connection with friends, family, and customers.
Tips for optimizing your Mikrotik Hotspot:
- Create a custom login page: Visit our article “Give Your Mikrotik Hotspot Login Page a Boost: A Practical Guide to Impressing Your Users!” and learn how to create a professional and memorable login page that strengthens your brand and impresses your users.
- Manage your users: Control access to your Hotspot network by setting time, speed, and content restrictions for different groups of users.
- Customize your Wi-Fi network: Give your Wi-Fi network a unique name and set a strong password to ensure the security of your connection.
With MKController and Mikrotik, you have everything you need to create a secure, efficient, and personalized Wi-Fi network, just the way you need it!
Did you not find the information you were looking for? Do you have other questions? Do you want to help us improve the material? Do not hesitate to contact us and seek support from MKController! Click here for any questions.
If you have Mikrotiks in your network, enhance the control, efficiency, and remote access of your Mikrotik with MKController. Click here to try it now and discover the power of advanced and intuitive management to elevate your experience to new heights!