File transfer via FTP by MkController - MKController
We know that file transfer via FTP has security restrictions, due to the use of ephemeral ports, and the transfer of data without encryption, the data is transmitted in plain text format and someone can intercept the TCP packet with Sniffing.
In order to provide a secure way to transfer files via FTP on Mikrotiks devices, MKController provides this service via VPN. In this way, the transmission of files will have a layer of protection passing through the platform’s resources.
MKController supports both Active FTP and Passive FTP according to RFC 959. In practice, the MKController program runs on your machine and will convert to https requests, bringing SSL security to your transactions.
For this scenario, we use the free FileZilla program, which you can download by clicking here (but you can use other FTP programs), and the MKController app that you can see the manuals for the Windows and Linux versions.
Steps for transferring files via FTP
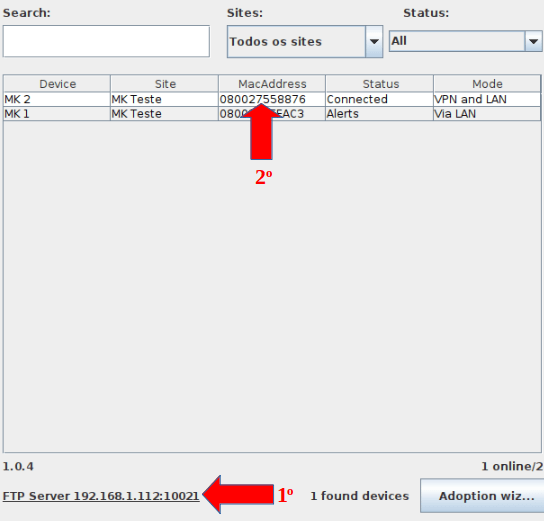
To connect via FTP to Mikrotik via VPN, we must get some information from the MKController desktop app.
1 – With the desktop app open, we will need the host IP information and the FTP port that the MKController uses to connect to the Mikrotik (1st indication).
2 – Another piece of information is the MacAddress of the device, which will be used for the login along with the email registered in MkController, separated by the forward slash “\”.
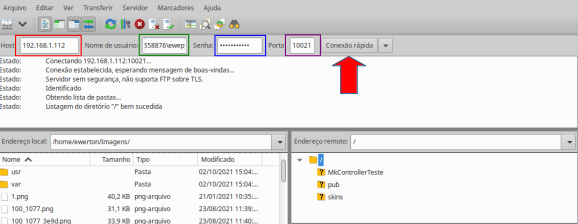
3 – With the information collected in the previous steps, in a file transfer program via FTP (in this scenario we use FileZilla), fill in the following information:
In the field highlighted in red in the figure below, inform the Host IP, (checked in step 1).
Highlighted in green, inform the MacAddress of the devices (verified in step 2), plus the backslash “\” and your email registered in MKController (example, AABBCCDDEEFF\everton.658@mk.com.br).
In the field highlighted in blue, enter the password of your user registered in MKContorller.
Highlighted in purple, the FTP port that MKController uses to connect with the device (checked in step 1).
With the fields filled in, click on the button to connect with the Mikrotik device via VPN from MKController.
In Local Address, it shows the files that can be transferred by dragging them to a directory in the Remote Address on the right, or with simple Ctrl+c and Ctrl+v.
In this documentation, information was presented to transfer files via FTP on the MIkrotik device using the VPN resources of MKController.
Didn’t find the information you were looking for? Do you have other questions? Do you want to help us improve the material? Do not hesitate to contact and send help from MKController! Click here for any question. If you have not adopted your Mikrotik device in MKController, simply click here to follow the documentation.